Peer review and creating a trail

With MathCityMap’s student accounts, you can let your students create their own outdoor activities. In addition to the classic math trail, this offers a unique opportunity to explore mathematical concepts. This step-by-step guide will show you how to improve your activities and combine them into a shared trail.

Step 1 – Start the peer review

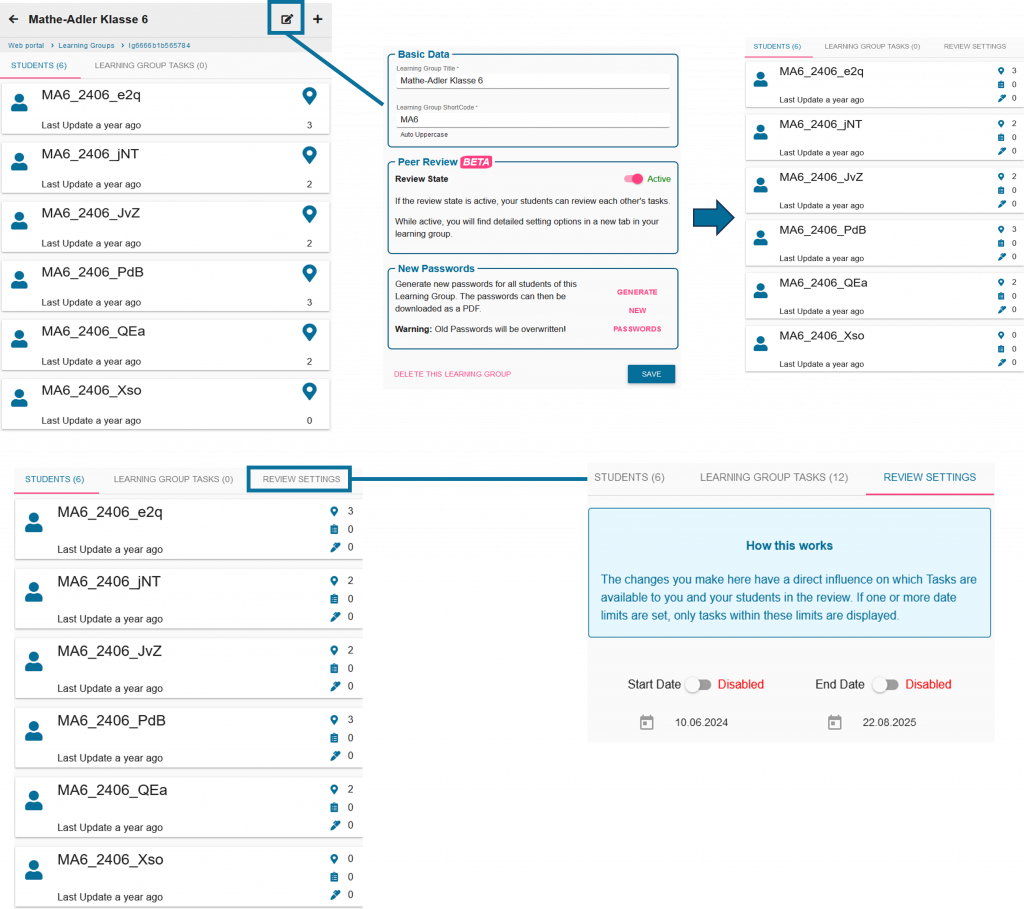
Once your learners have created their assignments in the web portal, you can start the peer review. This means the technical setup of the web portal, allowing your learners to write comments there.

To do this, click on the editing symbol next to your study group and activate peer review.

You can also set a start and end time via the review settings.
Step 2 – Organizing the peer review

Discuss with your learners which small groups will test which tasks. Your learners will then go outside again with their measuring tools.

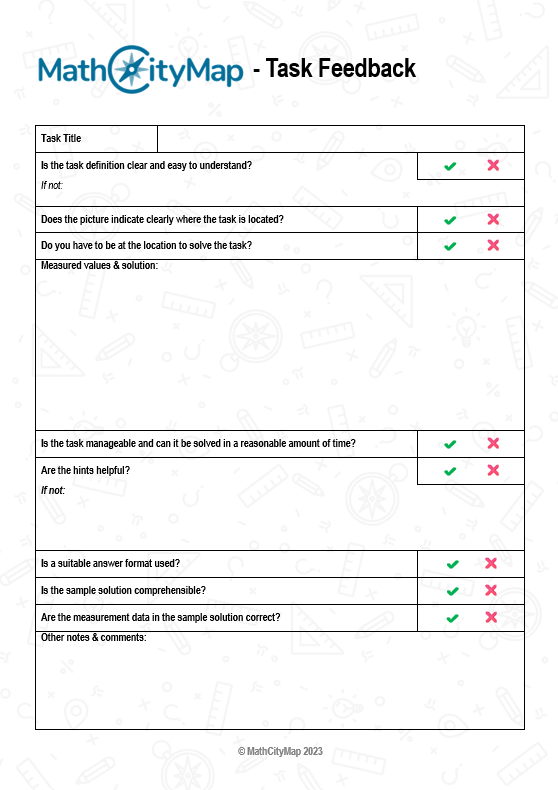
In addition, they are supported by the Peer Review worksheet (see materials page) in the form of a checklist to give appropriate feedback.

Step 3 – Write comments and incorporate feedback

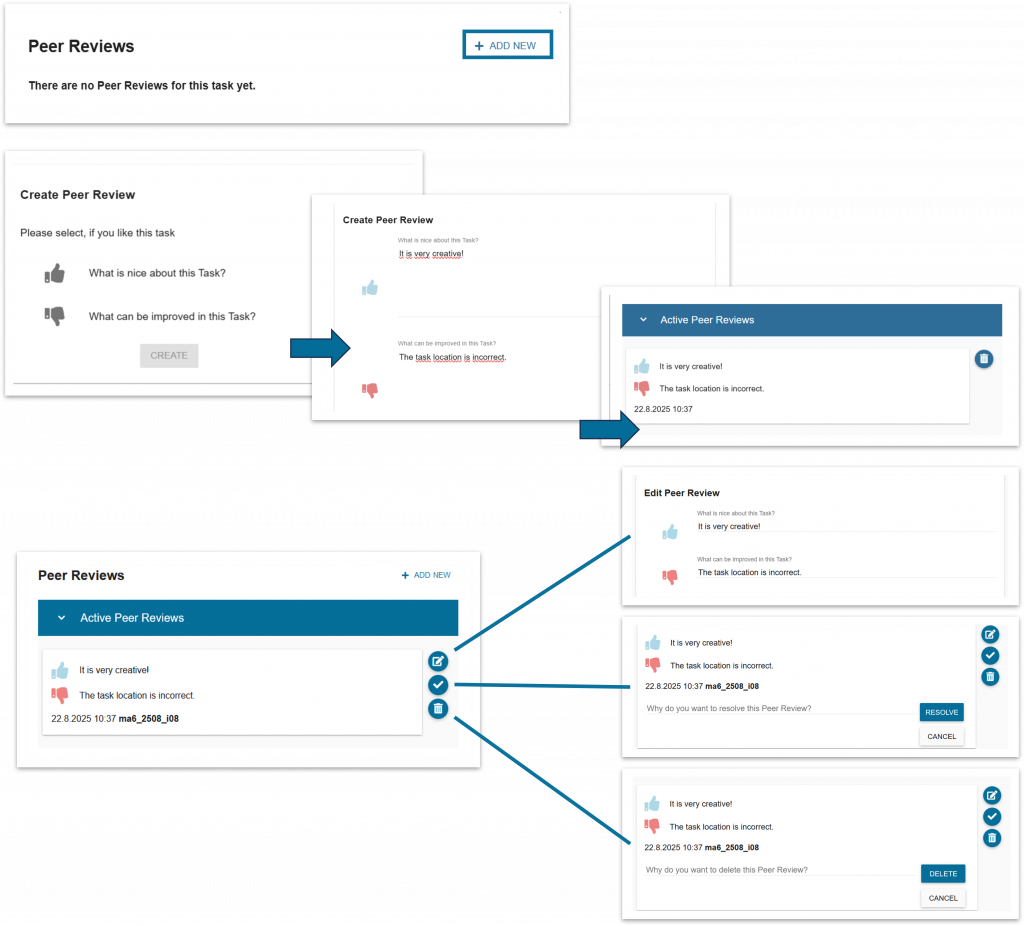
Once the tasks have been tested, the learners enter their feedback in the web portal.

You can also see your learners’ comments and intervene if necessary.

Then give your learners time to incorporate the class feedback and revise the tasks.
Step 4 – Create the trail

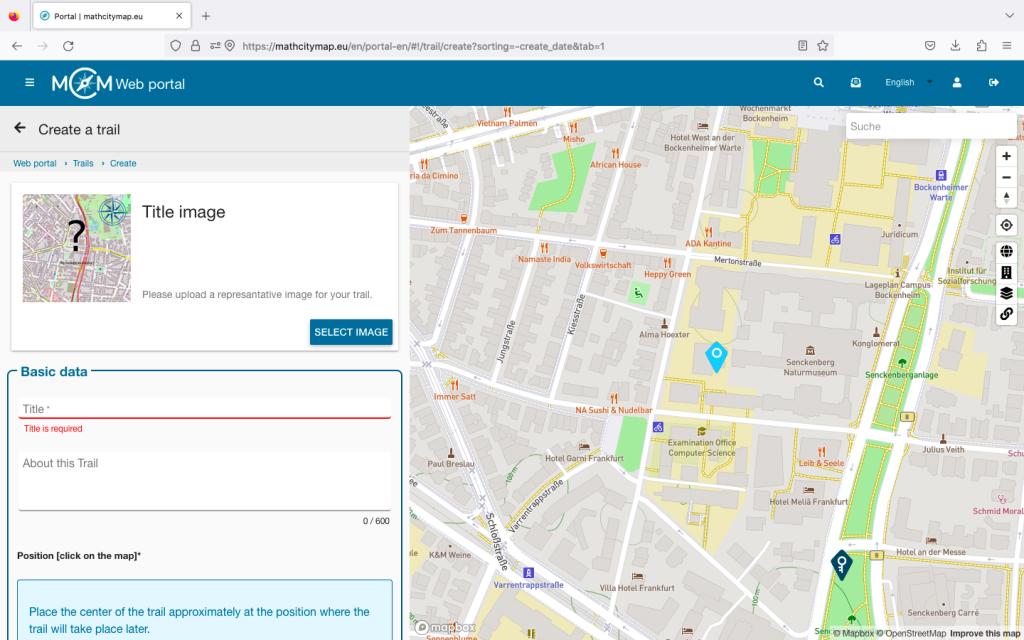
Once everyone has completed this process, you can compile a trail from your learners’ tasks.

This works via the normal trail field.

Student tasks are always displayed as pink pins.

Further Instructions

Create tasks with the student accounts

With MathCityMap student accounts, you can let your students create their own outdoor tasks. In addition to the classic math trail, this offers a unique opportunity to explore mathematical concepts. Here you’ll find step-by-step instructions describing how to find and create tasks on the portal.

Note: In the MATRIX project, we have created a self-study course for your students that guides them through some of the steps listed here. Your students will find this course as soon as they log into the portal with a student account. It includes instructions on creating assignments and using the web portal, and you can assign it as homework in advance if needed.

Step 1 – Search for task ideas

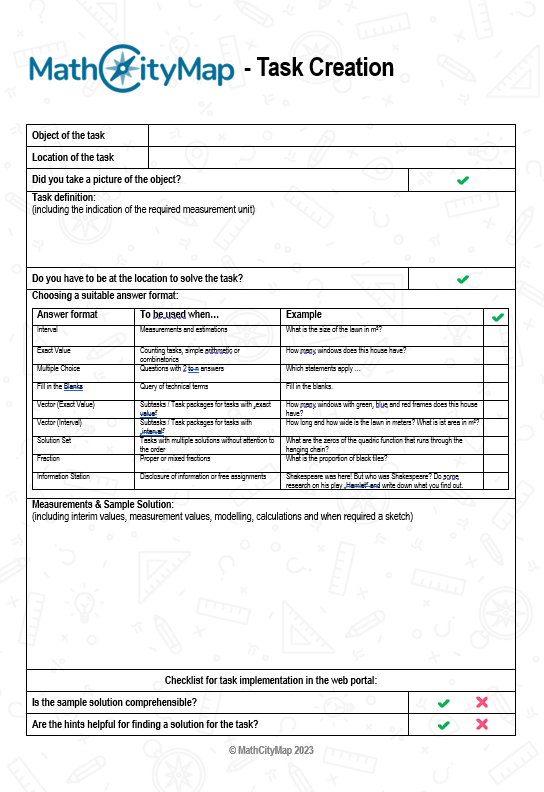
Once all the organizational details are sorted out, you can divide your class into teams of three and equip each team with measuring tools. Also, give them enough copies of the worksheet for completing the task (see materials page).

Take your class outside to the location where the tasks will be created. Give your students enough time to search for task ideas and document them using the worksheet.

Provide them with assistance if they don’t have their own ideas, and give feedback on their ideas.

Step 2 – Complete task ideas

Once each small group has gathered task ideas, you go back to the classroom.

The students first fill out the worksheet for creating tasks inside (see material page), i.e. they complete their task ideas with hints and a sample solution.

Step 3 – Create tasks in the portal

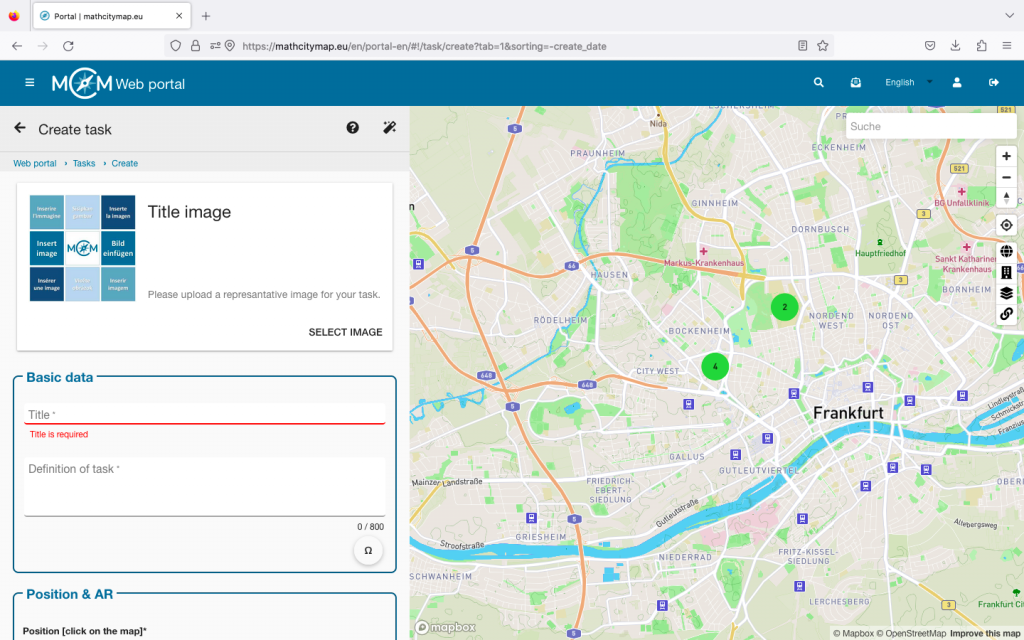
Next, you give the students an introduction to using the web portal, specifically how to create an assignment with their student accounts. This works exactly the same way as with regular accounts.

In the next step, you give each student the login details for a student account you previously created. You can learn how to create these accounts in the tutorials “Creating Learning Groups” and “Managing Learning Groups”.

Now have your learners create the tasks in the web portal.

Further Instructions

Preparing lessons with student accounts

With MathCityMap’s student accounts, you can let your pupils create their own outdoor activities. As well as the traditional way of completing a Mathtrail, this offers a unique opportunity to look at things through a mathematical lens. Here you’ll find step-by-step instructions to help you prepare your pupils for this.

Step 1 – Discover a MathCityMap trail

Before the planned lesson on creating tasks, you should familiarize your students with the idea of ​​MathCityMap.

Have them walk a math trail and collect their impressions of the tasks.

Step 2 – Changing perspectives and organizational issues

Then change perspective with them: Discuss the idea of ​​creating individual tasks and a joint math trail as a class product.

Further clarify what your students’ objectives will be in the tasks: Should the tasks be modeling tasks, for example? Is the math trail intended for a specific target group, such as younger students? Or is it to be created for a special event, such as the upcoming school festival? How many tasks should be created?

It is advisable to clarify these questions beforehand in order to agree on the type of tasks, topics, and target group. You may also want to provide your learners with guidance on creating tasks.

Further Instructions

Webportal in the App

The MathCityMap web portal can also be used directly via the app. This allows you to access and manage created content such as tasks and trails. Here is a step-by-step guide to accessing and using the web portal in the app:

Step 1 – Open the Webportal

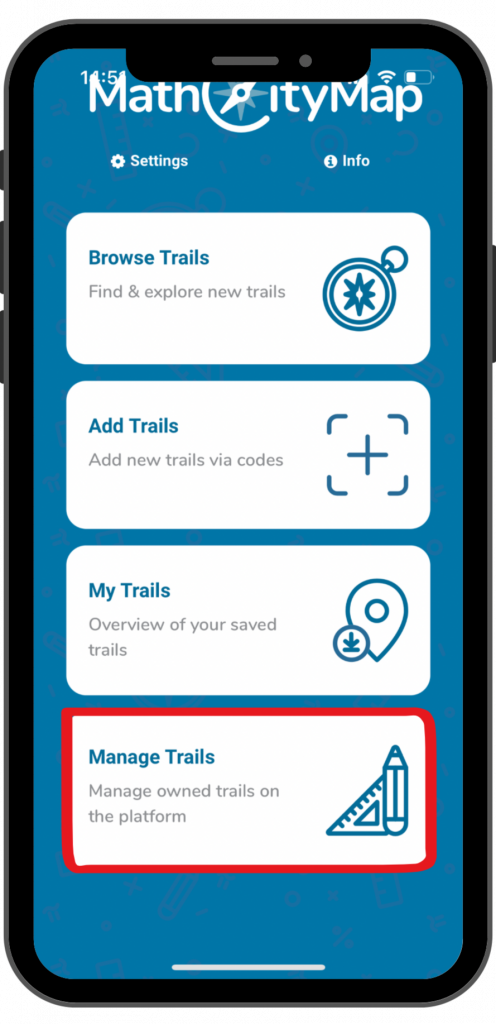
To be able to use the web portal in the app, you must first activate the management option in the settings.

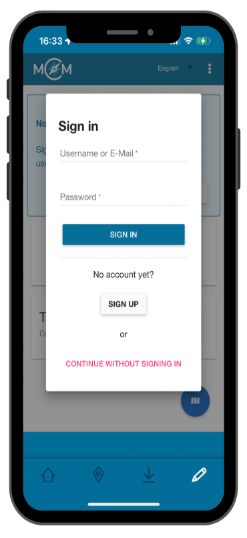
Then you can click on the “Manage trails” field on the start page. The web portal and a login window will open.  

Step 2 – Log in to the Webportal

If you already have an account in the MathCityMap web portal, you can sign in directly.

Otherwise, you can register.

You can also continue without logging in, but then you will not be able to use all the functions of the portal. 

Step 3 – Functions of the Webportal

 
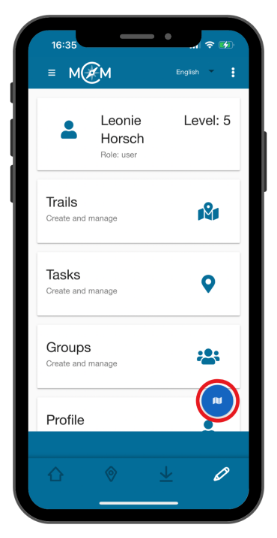
You can use the web portal via the app in the same way as you do via the browser. Only the view is slightly different when using the smartphone.

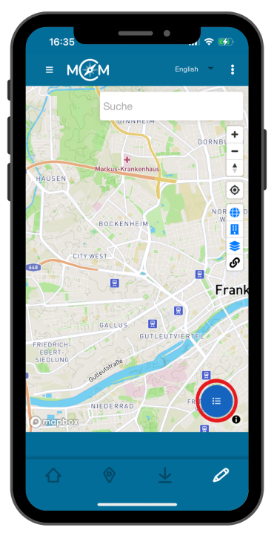
Here you will find the menu fields in list form and can switch to the map view by clicking on the map symbol at the bottom right.

You can also switch back to the menu view by clicking on the list icon.  

Step 4 – Manage Content

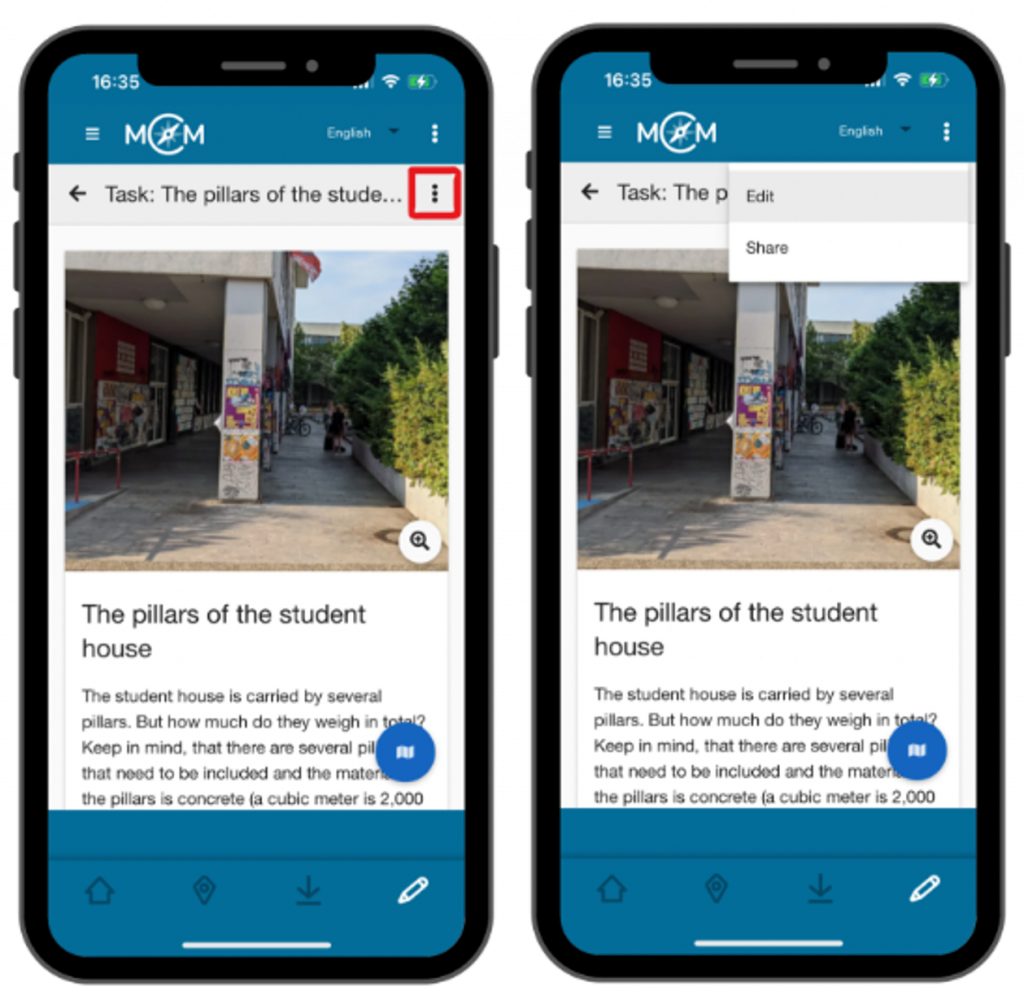
In contrast to using the web portal on a tablet or laptop in the browser, you will find the various management options for your content under the three dots at the top left if you have clicked on a task, a trail or a group.  

Step 5 – Exit the Webportal

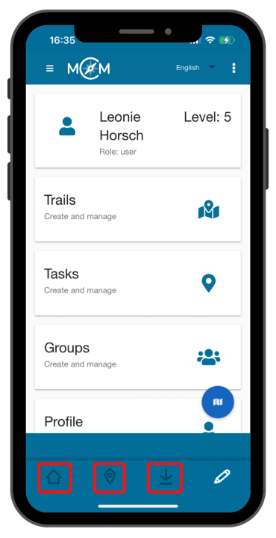
You can return to the various app functions by clicking on one of the symbols in the lower blue field.

The house icon stands for the start page of the app, the location icon for searching for trails and the download icon for your saved trails.

Further Tutorials

Community

Partner schools play an important role in the MathCityMap project. These schools create new tasks themselves and put the concept of outdoor math learning into practice. In the web portal, teachers can join their school and participate in joint activities.

Step 1 – Partner schools

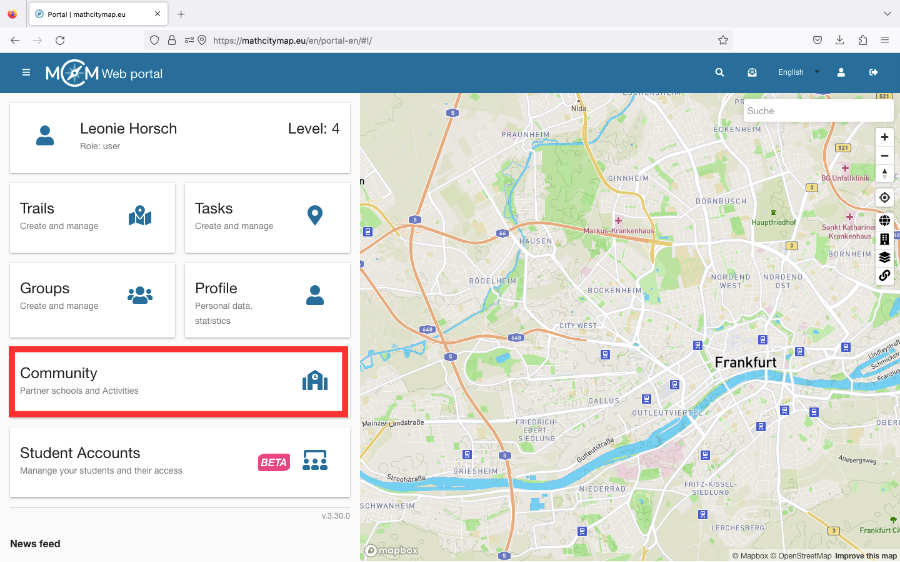
Click on the “Community – Partner schools and activities” field on the homepage or select “Community” in the menu bar on the left-hand side.

A list of partner schools will open, sorted in alphabetical order according to the country in which they are located.

If you click on a school, you will find an e-mail address as a contact and the location of the partner school.

Students and teachers can also join their school.  

Step 2 – Activities

There are various activities that teachers from partner schools can take part in to learn about the development of the project or to have the various applications explained to them.

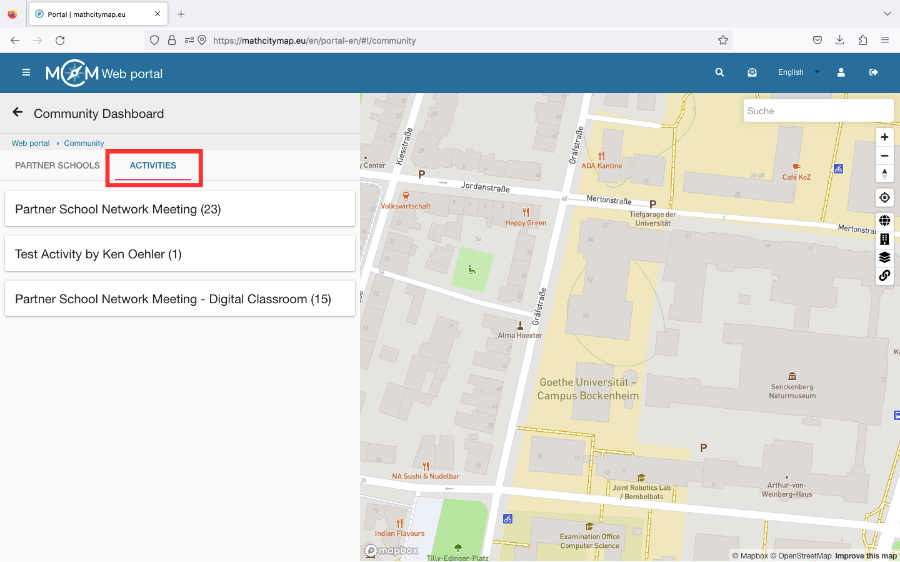
To see if and when an activity is offered, click on “Activities” under “Community”.

Then click on the desired activity. If you are authorized to participate, the field “Participate in this activity” will appear.

Step 3 – Become a new Partner School

To become a partner school, you need to create 15 tasks and two trails for different grades near your school.

These should be published in our system and reviewed by the school’s math teachers.

They should also have been downloaded at least five times by learners.

If these conditions are met, an application to become a partner school can be sent to info@mathcitymap.eu.

This should contain the codes of the trails as well as a short report on the experience with MCM.

Further Tutorials

Read Aloud Function

The read aloud function enables app users to listen to trail information or task assignments. Here is a step-by-step guide on how to activate and use this function:

Step 1 – Open settings

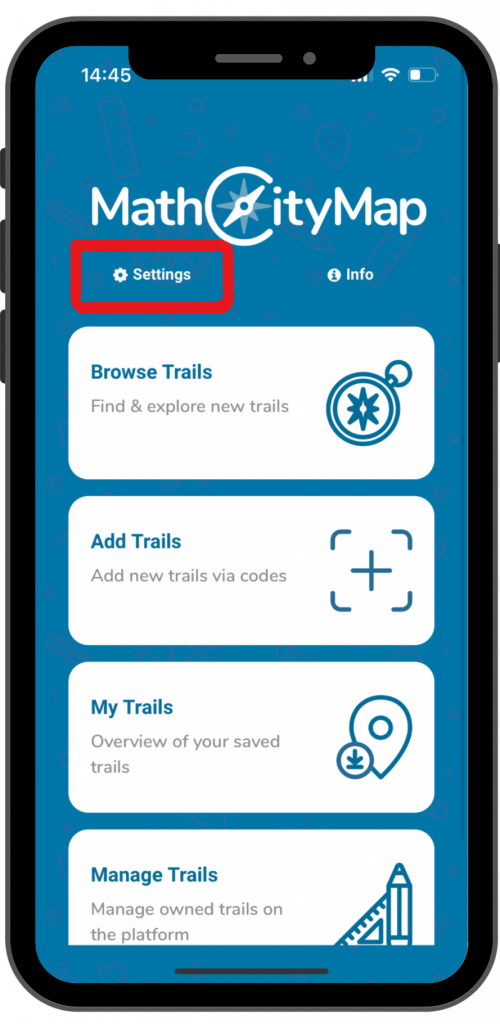
Click on “settings” next to the cogwheel symbol at the top left of the start screen.

A view with various setting options will open.

Step 2 – Activate read aloud function

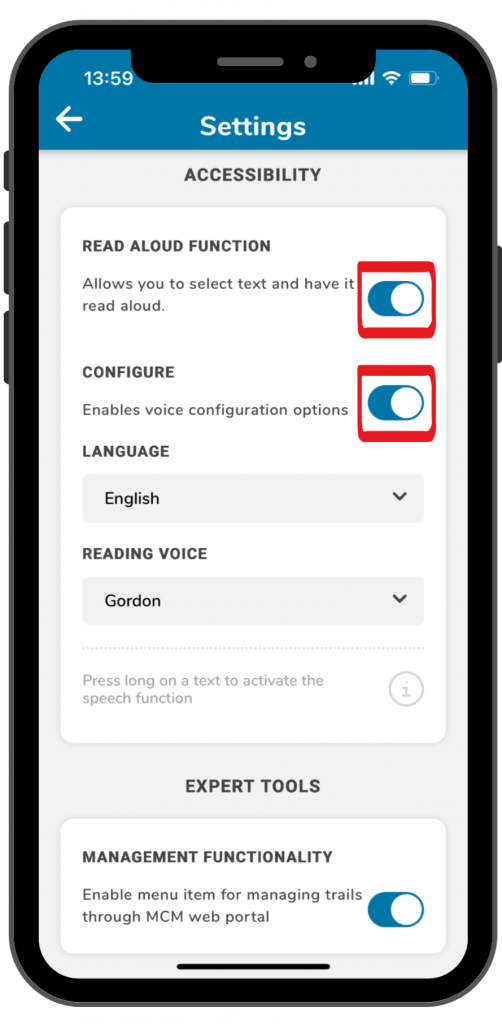
Under the title “accessibility” you will find the read aloud function.

Click on the switch on the right side to activate the function.

By clicking on the switch next to “configure”, you can select different languages and voices.

Step 3 – Use read aloud function

 
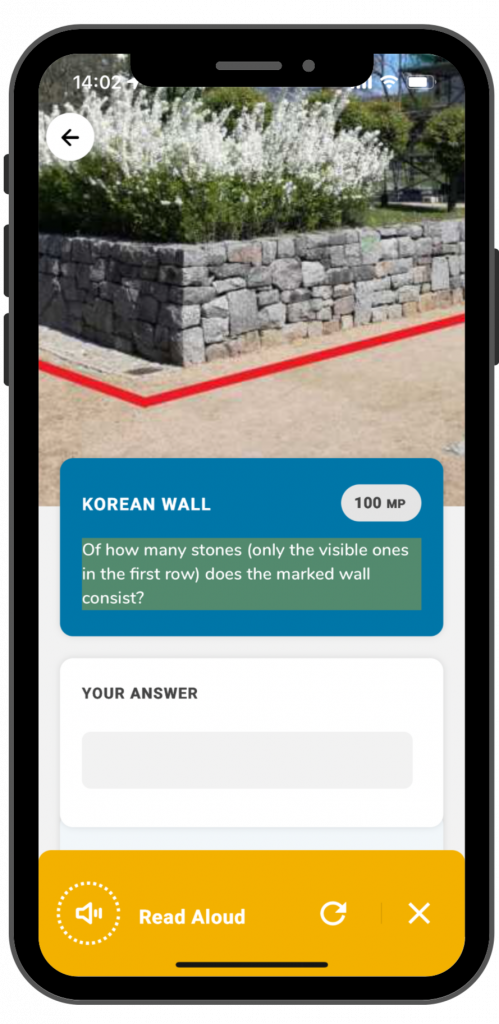
As soon as the read aloud function is activated, you can use it in the app. This works for trail information and task assignments.

To use the read aloud function you have to click on the text for a longer time.

A yellow field will come up at the bottom of the screen. By clicking on the arrow, the read aloud process will be repeated. By clicking on the X, the yellow field will disappear.

Further Tutorials

Automatic Translation

With automatic translations you can walk trails or solve tasks in different languages that you normally wouldn’t understand. Here is a step-by-step guide on how to activate and use translations in the app:

Step 1 – Open settings

Click on “settings” next to the cogwheel symbol on the top left of the landing page.

A view with various setting options will open.

Step 2 – Activate translation function

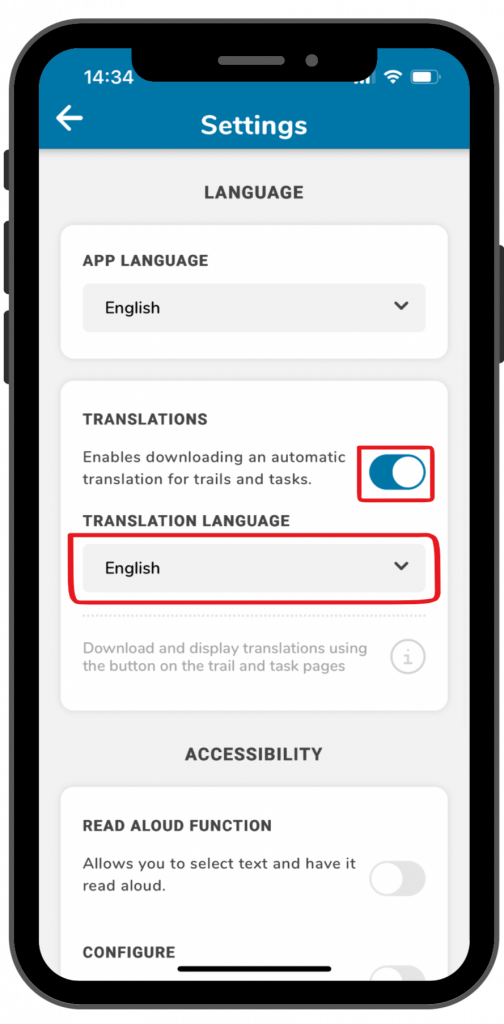
Under the title “language” you can select different languages for the app, but you can also activate translations.

Klick on the switch next to “translations”, to enable translations for trails and tasks.

Under “translation language” you can select different languages.

Schritt 3 – Using the translation function

 
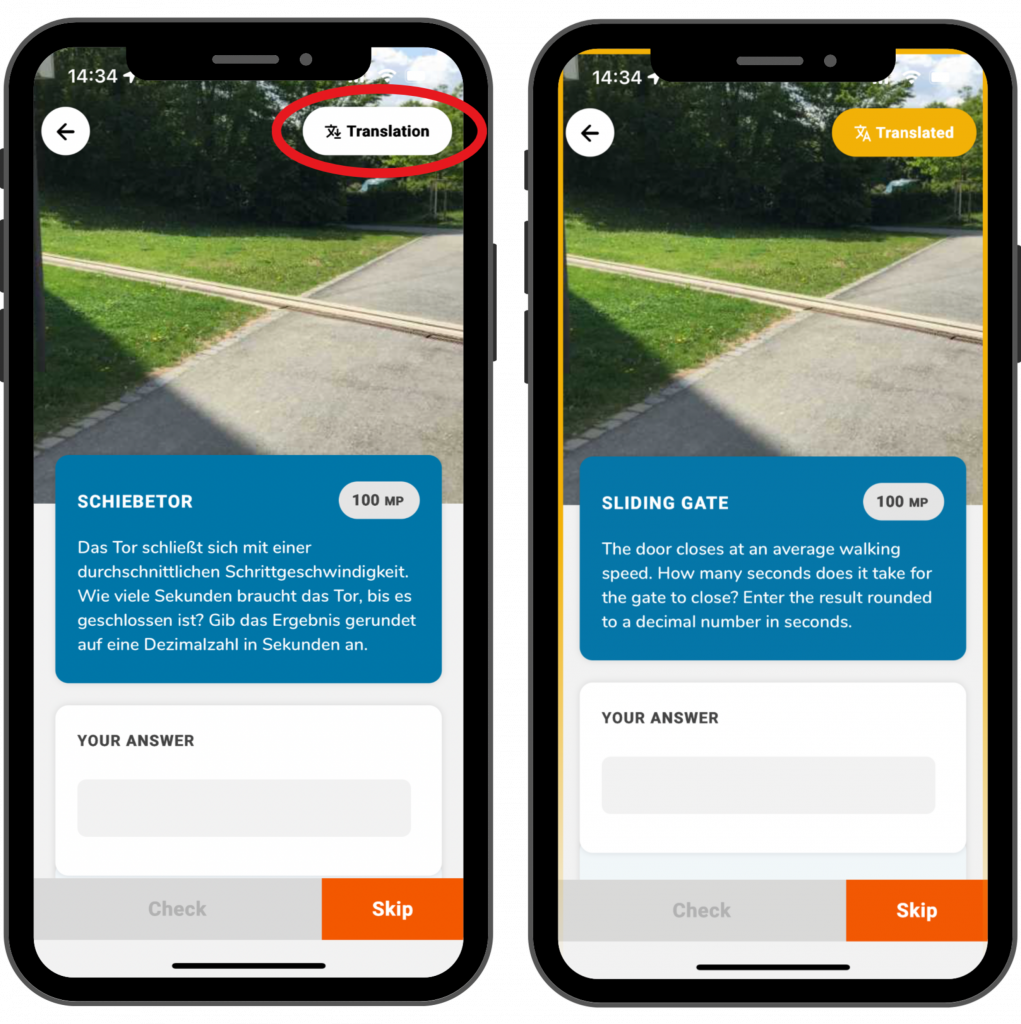
As soons as the function is activated in the settings, a translation button will come up for trails and tasks in the top right corner of the screen.

By clicking on the button, the trail or task will be translated in the language that you have selected in the settings.

As soon as you request the translation, a yellow frame will come up on the screen. That way you know that you are not looking at the original, but at the translation. By clicking on the translation button again, you will come back to the original.

Further Tutorials

AR Tasks

MathCityMap tasks can also contain augmented reality elements. This provides MCM users with visual and interactive tools to make the tasks even more interesting. Here is a step-by-step guide to creating AR tasks:

Step 1 – Create Task

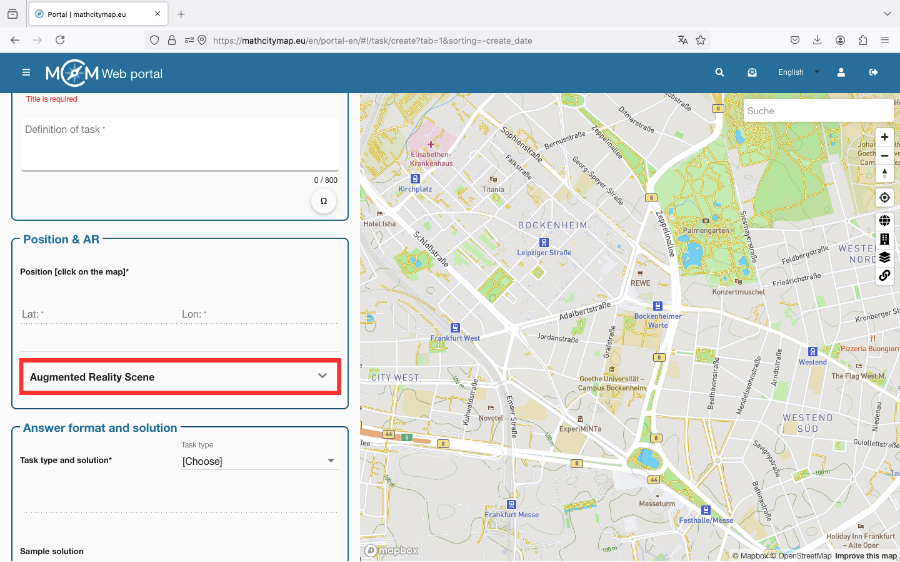
Under “Tasks – Create and manage”, click on the plus symbol and on “New task”.

To add an augmented reality scene to a task, you must then click on the “Augmented reality scene” field in the “Position & AR” box.

Step 2 – Create AR Scene

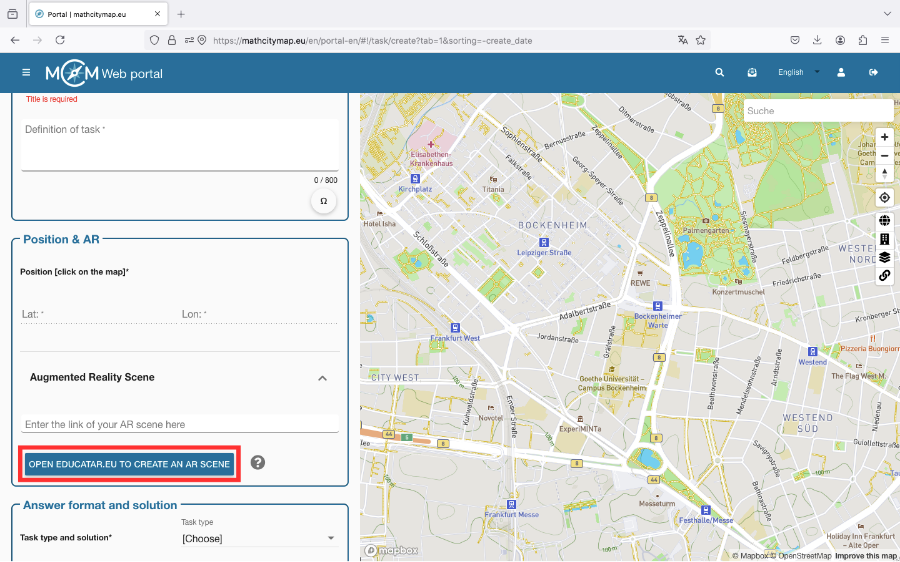
Click on the “Open Educatar.eu for a new AR scene” box. You will be redirected to the Educatar.eu website.

There you can create an augmented reality scene that allows you to display virtual content (text, images, etc.) against a real background using a smartphone.

You can find a detailed tutorial on this under this Link (Website MaSCE³-Project).

Step 3 – Insert link in MCM

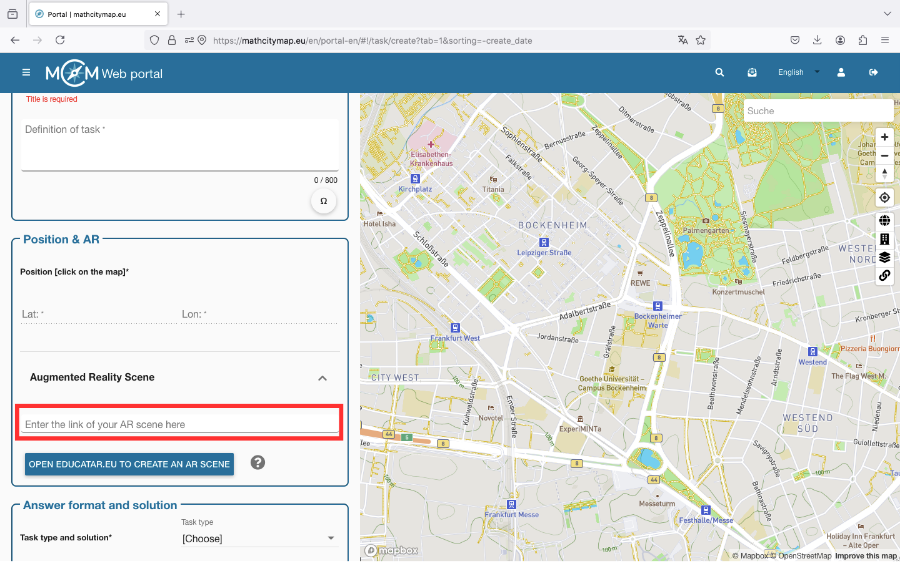
Once you have created a scene on educatar.eu, you can enter the URL of the scene in the appropriate field.

MCM users can then open it via the MCM app. 

Further Tutorials

Manage Learning Groups

You can edit your learning group at a later point or monitor the progress of your learners. Here is a step-by-step guide to managing your learning group:

Step 1 – Edit Learning Group

Click on the learning group that you want to edit.

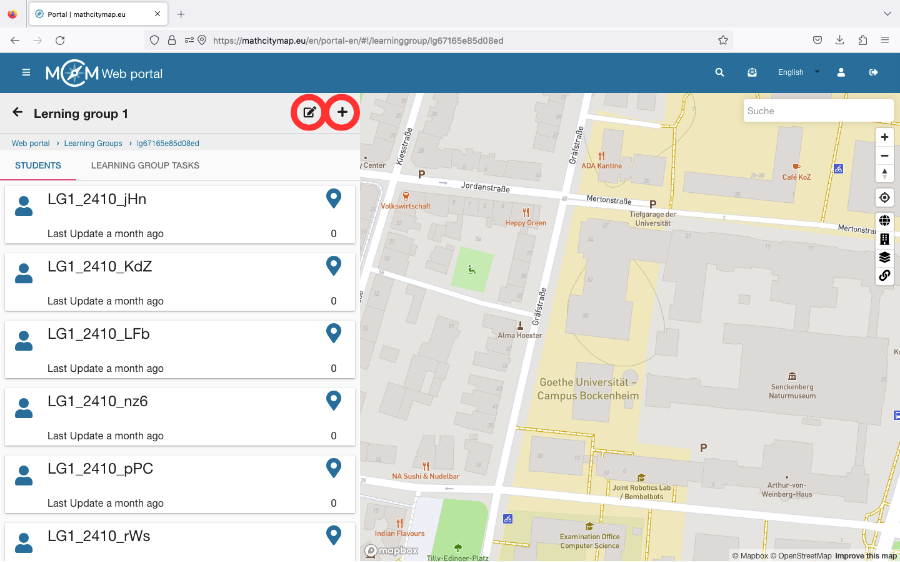
You will see a plus symbol at the top right. This allows you to add new learners to your learning group.

If you click on the edit symbol, you can edit the title and abbreviation of your learning group.

You can also delete the learning group here if necessary.  

Step 2 – Tasks of the Learning Group

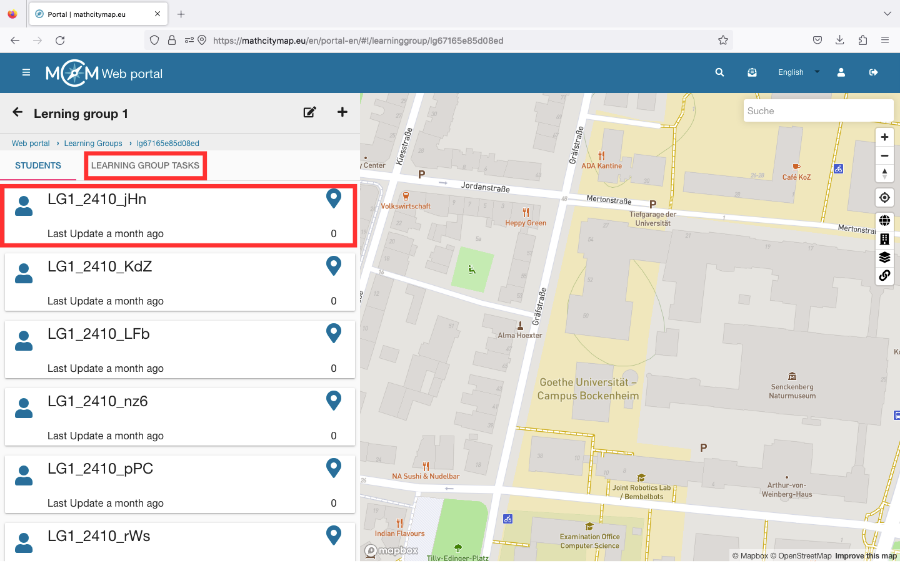
You can see which tasks have already been created and by whom.

Either click on individual learners to see their progress or click on “Learning group tasks” to see all the tasks that have already been created.

Click on a task to see more details. 

Further Tutorials

Create Learning Groups

Creating learning groups in the MathCityMap web portal allows learners to create and share tasks themselves. Here is a step-by-step guide on how to create learning groups:

Step 1 – Open the learning group area

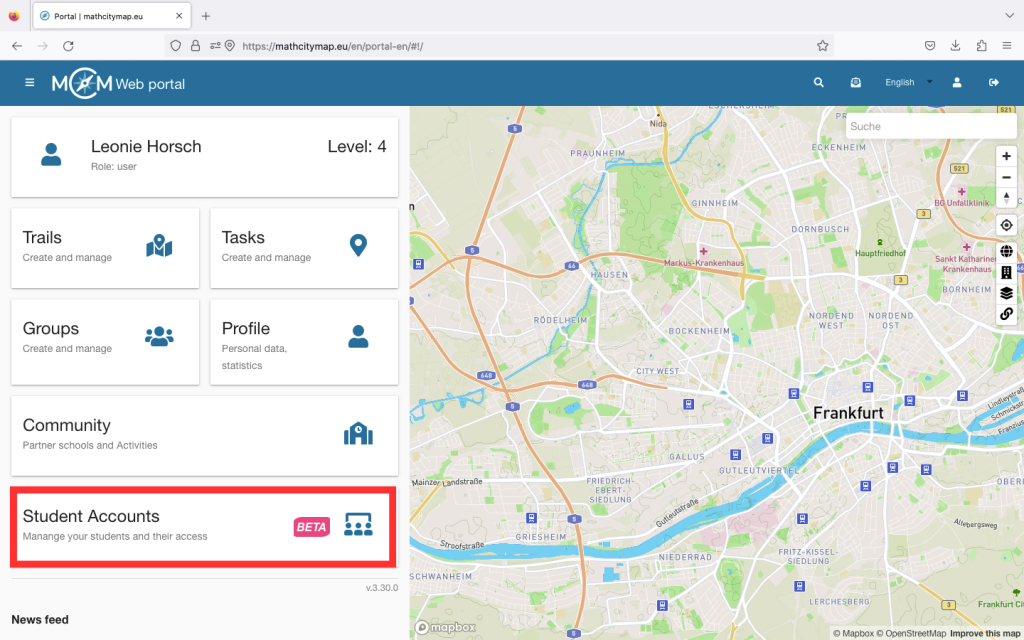
Click on the “Student accounts – Manage your students and their access” field on the start page or select “Learning groups” in the menu bar on the left-hand side.

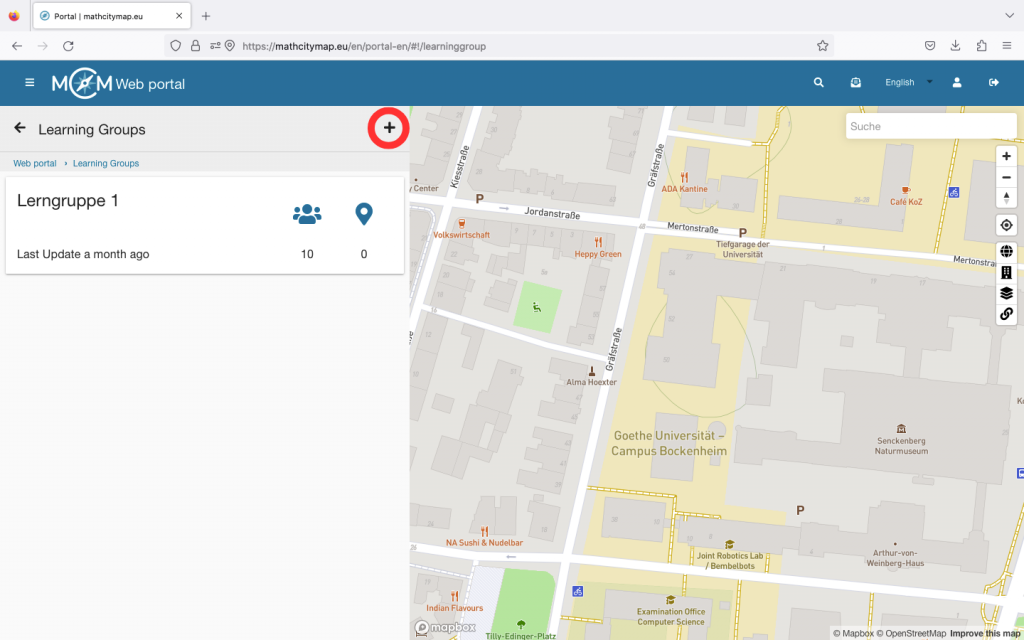
The page with your learning groups opens.

Step 2 – Create a learning group

You will find a plus symbol at the top right. Click on it to start creating a new learning group.

You will then be asked to enter the basic data for your learning group. Choose a unique name and enter an abbreviation for the learning group.

You must then enter the number of learners. Finally, click on “Create learning group”.

You will then be shown the access data to the web portal for the learners. Share these with your learning group so that the learners can log in to the web portal.

Further Tutorials