Manage Digital Classroom

The digital classroom offers many possibilities. Here you will learn how to observe, manage, and support your digital classroom live during, before or after the math trail.

Step 1 – Switch to the observation view

Open the trail for which you have created your digital classroom and click on the corresponding icon.

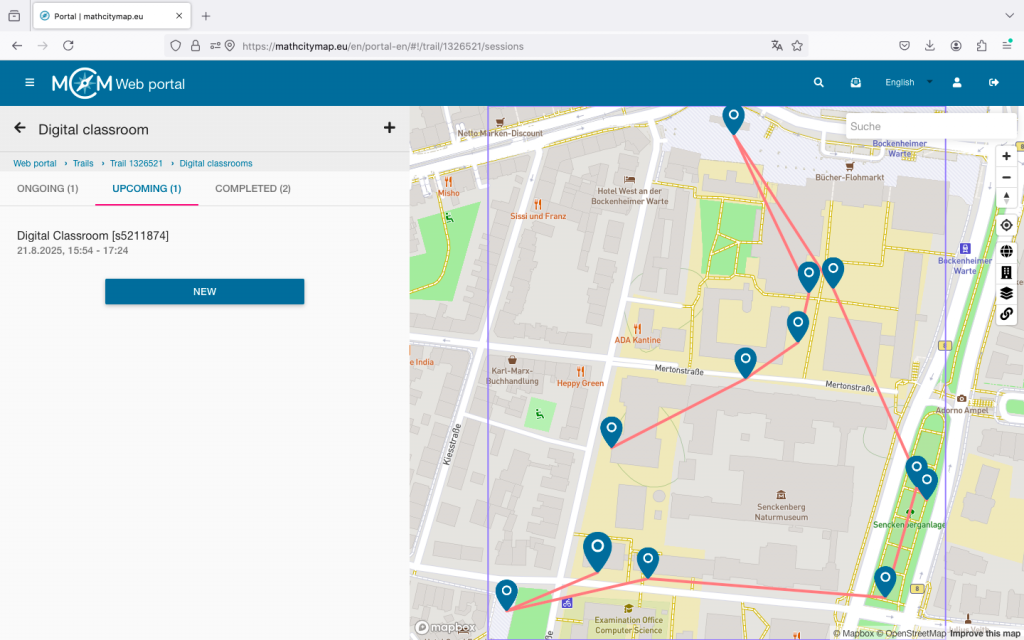
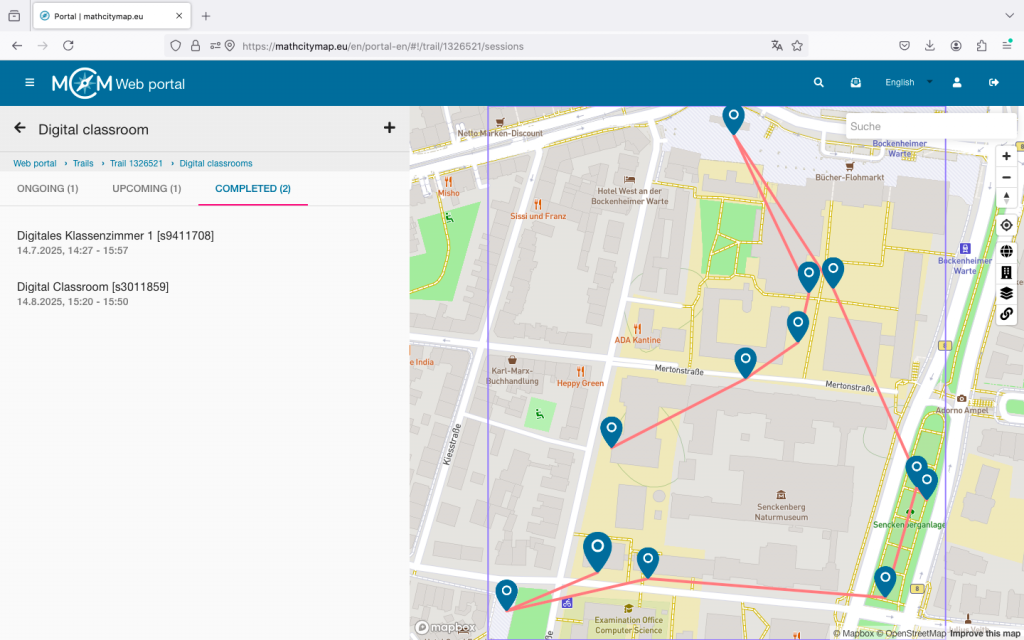
Depending on when you want to open the digital classroom view, you will find your digital classroom under “Ongoing,” “Upcoming,” or “Completed.”

Click on the desired digital classroom to open the observation view.
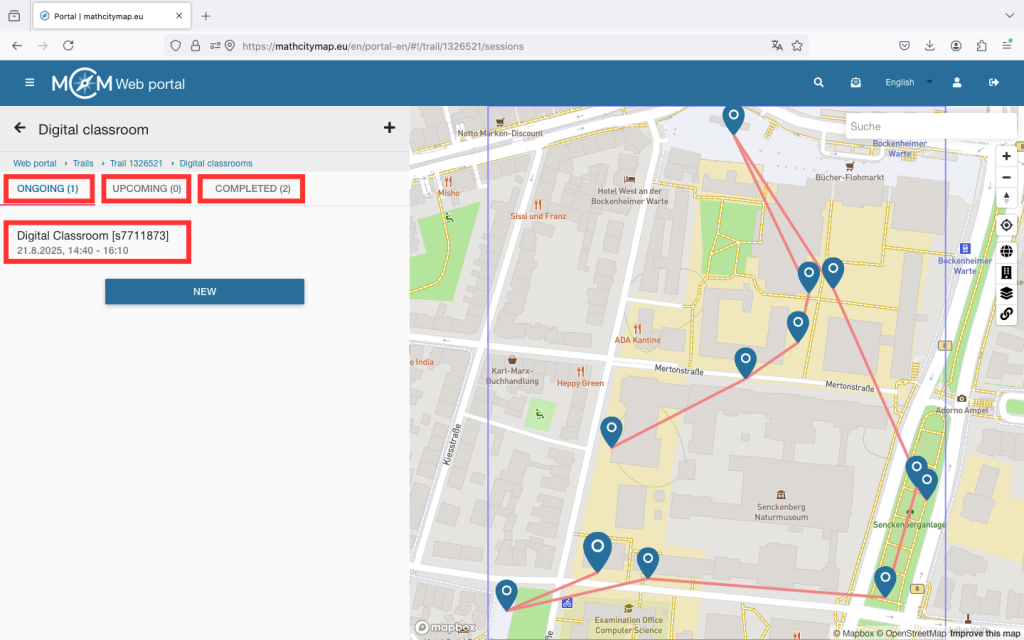
Step 2 – Overview in the “Ongoing” observation view

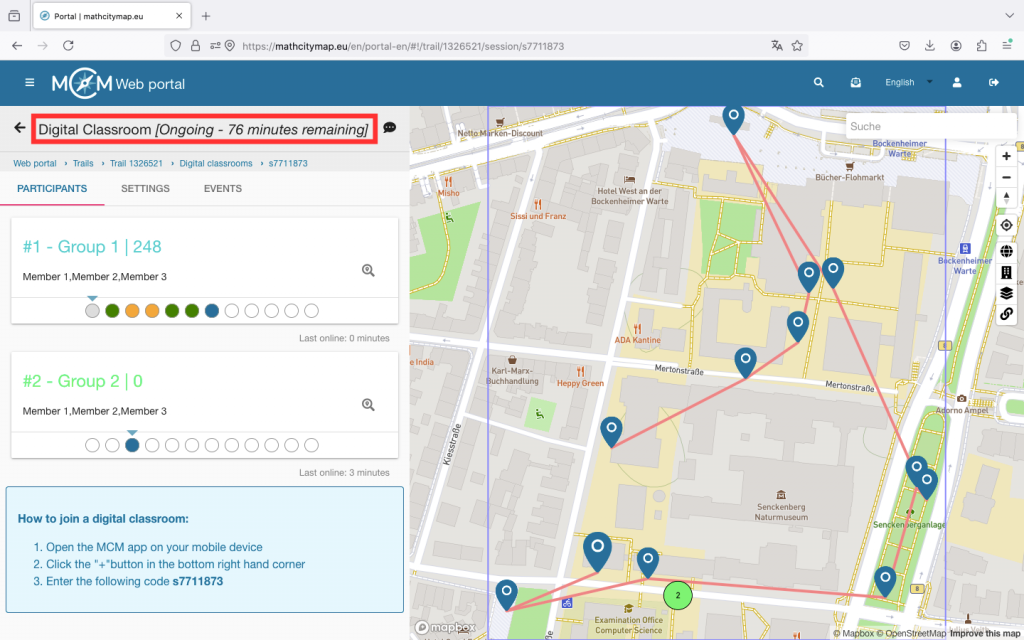
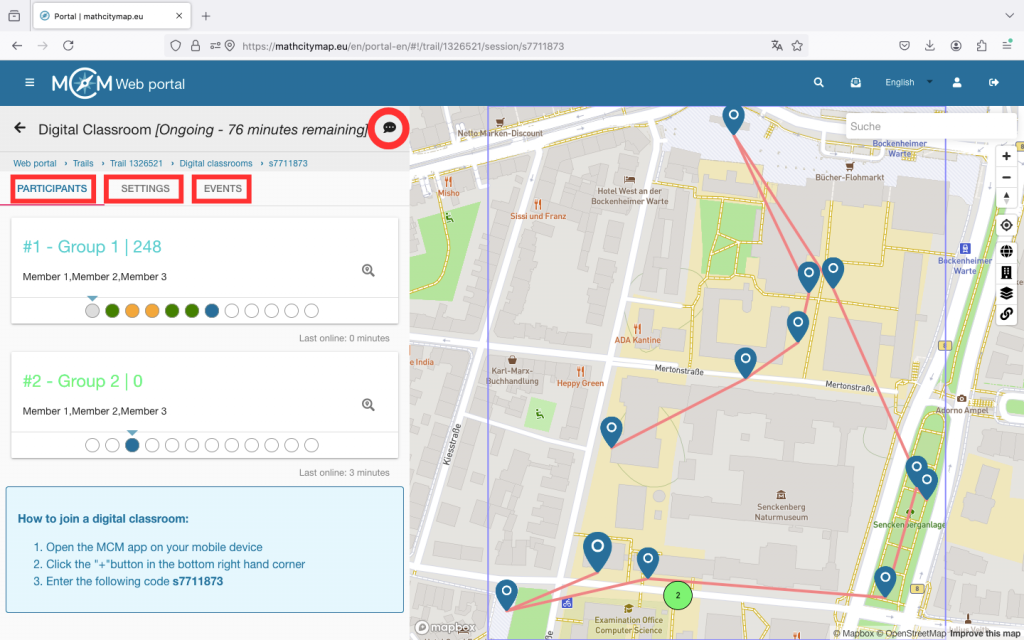
At the top of the view, you can see how many minutes are left, meaning when the digital classroom will automatically end.

The view shows a list of all joined groups with names, status, and points on the left side. The number after the hashtag indicates the order in which the groups joined. The group with the most points is always at the top of the list.

For each group, you can see round fields that represent the different tasks. A white field means the task has not yet been viewed. Blue means the task has just been opened. Red, yellow, and green stand for incorrectly, satisfactorily, or well-solved tasks. A grey field means that this group has skipped the task.

If you click on a group, you will access the chat. Here, you can communicate with the participants via message, voice note, or pictures throughout the session. Under “Events,” you can see how the learners proceed — for example, whether they use hints and whether they need multiple attempts to solve a task.

On the right side of the view, there is a map showing the tasks and the joined groups (provided they activate GPS). Through numbering and colour coding, the groups on the map can be easily found again in the list.

Step 3 – Additional functions in “Ongoing”

At the top right, there is a chat icon. By clicking on it, you can send a message to all participants at once. Use this, for example, for time-related hints.

Under “Settings,” you can, for instance, extend the session duration or adjust your view. You will also find some information about your digital classroom there.

Under “Events,” you can see all the actions of the joined groups. For a more compact view, select individual groups and then go to “Events.”

To remove members, click on the corresponding group and then click on the X in the top right. Confirm the action with “OK.”
Step 4 – Manage upcoming digital classrooms

Up to 30 minutes before the start of the session, you can adjust the settings of your digital classroom.

The same settings can be edited as when creating the digital classroom.

During the session and in the 30 minutes beforehand, editing is no longer possible.

Step 5 – Manage completed digital classrooms

Up to 6 months after the session, the collected data of the digital classroom can still be viewed.

For example, you can gain insights into which tasks were easy for the learners and which may have caused problems more frequently. These can be discussed again during a joint review session.
Weitere Anleitungen

Draft and Task Group

In the MathCityMap web portal, you can prepare tasks in draft mode before you finish creating the task. You can also bundle tasks that are all related to the same object into task groups. Here is a step-by-step guide on how to create drafts and task groups:

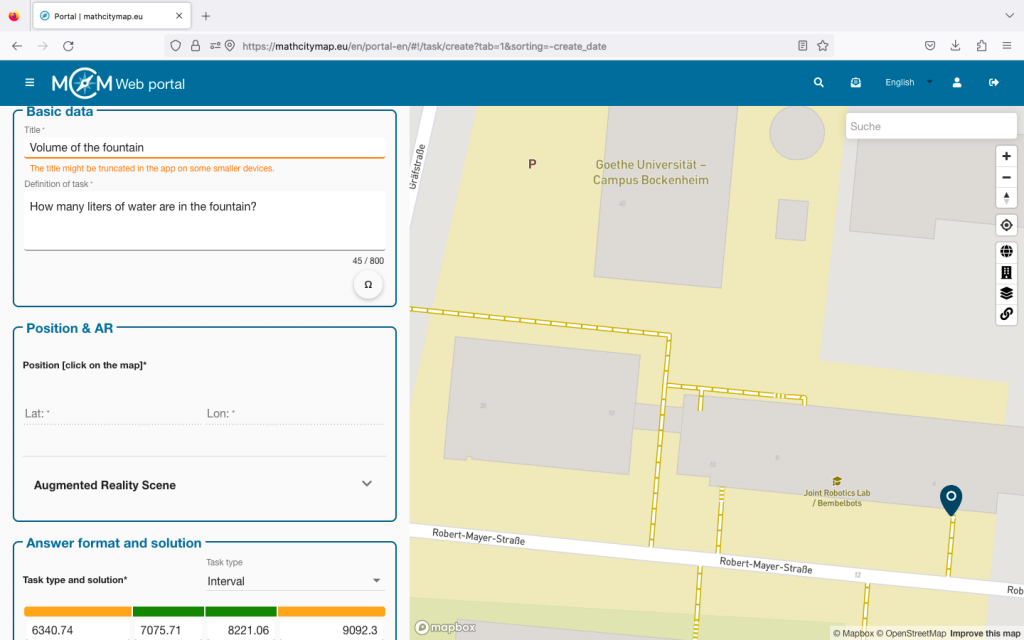
Step 1 – Create a new task

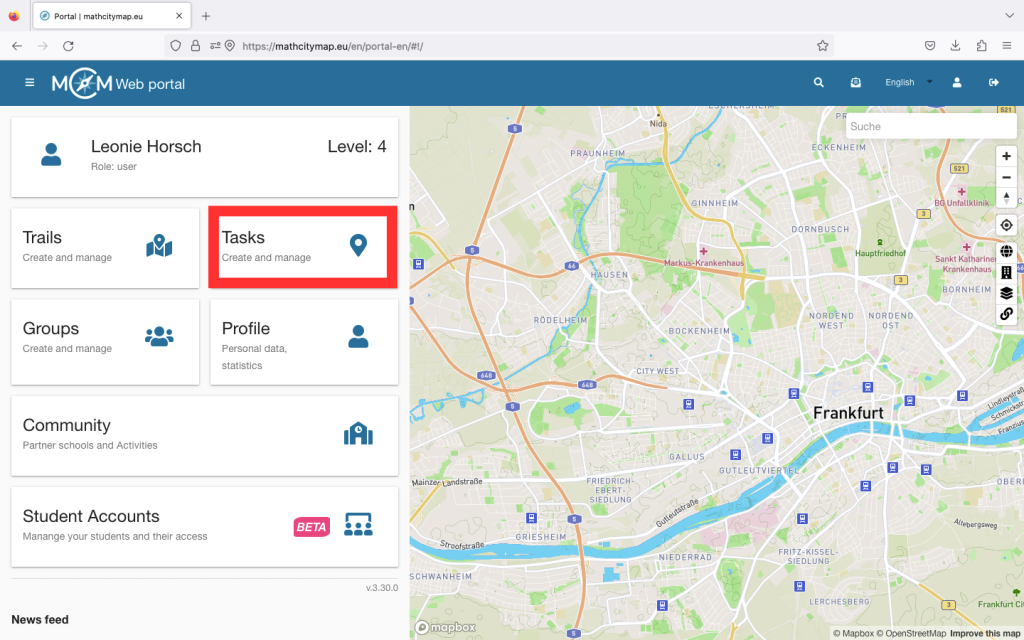
Go to “Tasks – Create and manage” or select “Tasks” in the menu bar on the left-hand side.

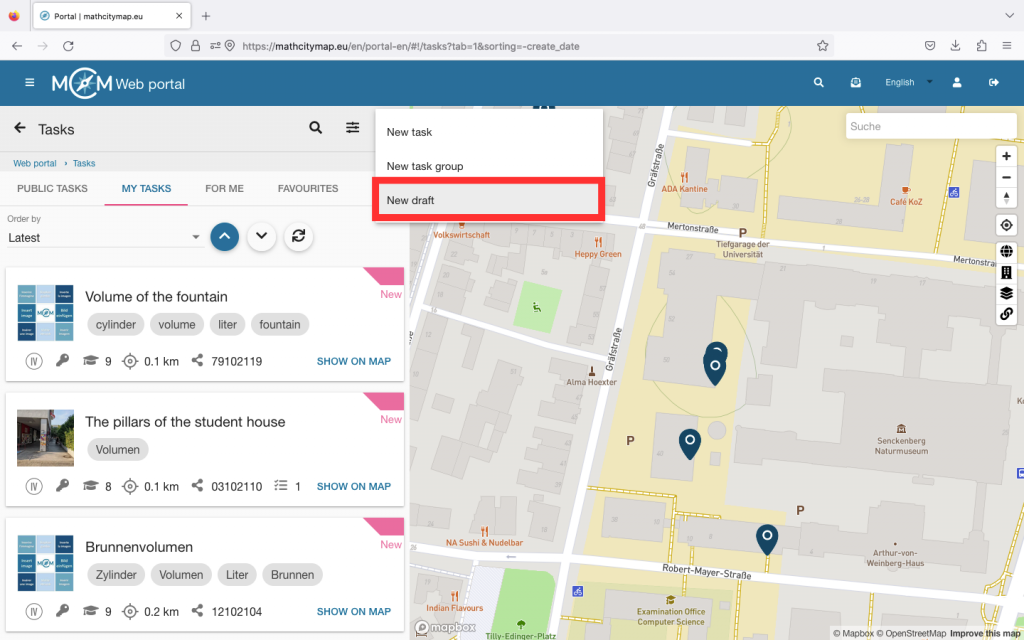
Then click on the plus symbol at the top right and select “New draft”.

You will then be asked to enter basic data for your task.

Click on “Create” to save your draft. 

Step 2 – Edit drafts

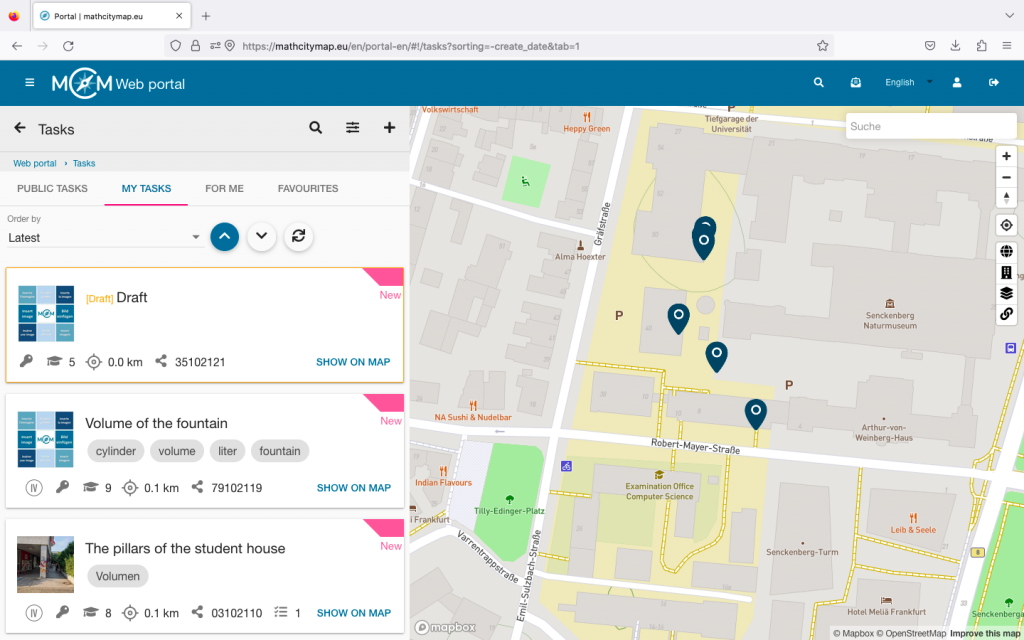
Like all other tasks, you can find drafts in your profile under “My tasks”. All drafts are framed with a yellow box.

If you want to complete the task, you can simply click on it and edit the task.

Once you have entered the missing information, click on “Save”.

Step 3 – Create task groups

Go to “Tasks – Create and manage” or select “Tasks” in the menu bar on the left-hand side.

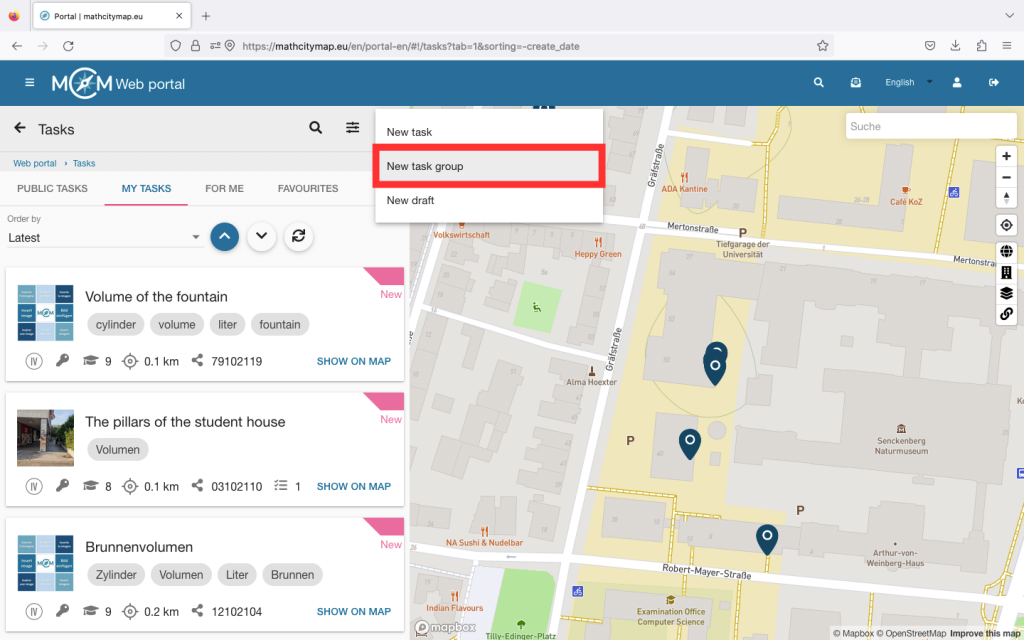
Then click on the plus symbol at the top right and select “New task group”.

You will then be asked to create the first task in your task group.

Once you have entered all the information, click on “Create” at the bottom.

Step 4 – Add subtasks

To complete your task group, you need to create additional subtasks.

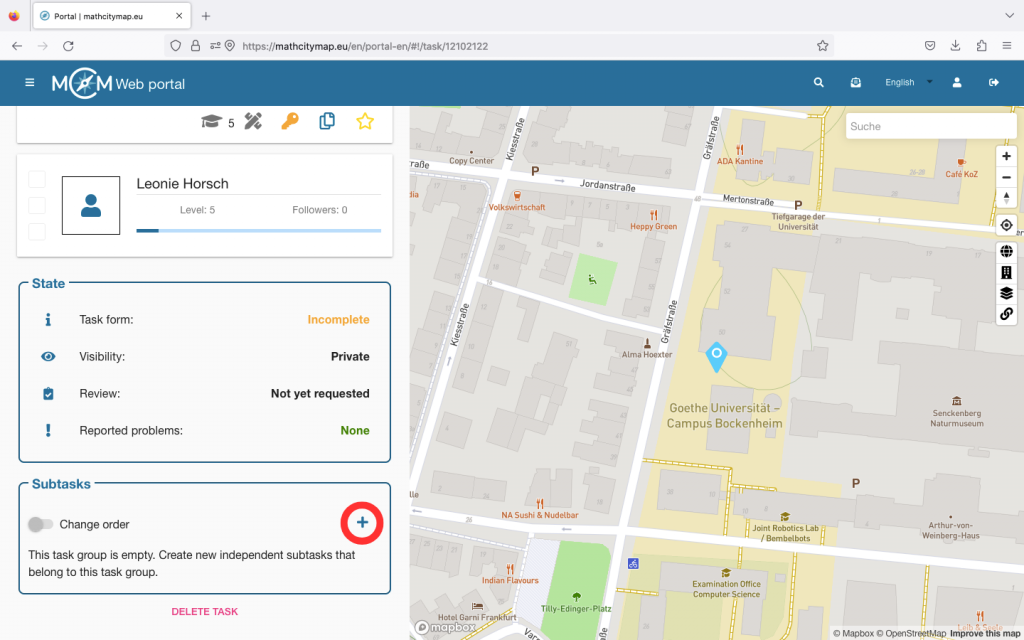
If you click on your task group and scroll to the bottom, you will be taken to the “Subtasks” section. Click on the plus symbol to add further subtasks to your task group.

The page for creating a task opens again. Click on “Create” to save the subtask.

Finally, you can change the order of the subtasks. To do this, click on the “Change order” button and move the subtasks so that they are in the right place.

Then confirm that you want to save the changes.

Further tutorials

Support Tasks

Support tasks are additional tasks designed to help learners better understand more complex tasks or calculate intermediate steps. These tasks can facilitate the learning process by focusing on and supporting partial aspects of a main task. Here is a step-by-step guide to creating and using support tasks:

Step 1 – Open task area

Go to “Tasks – Create and manage” and under “My tasks” select the task for which you would like to create support tasks.

This task then becomes the main task and can be subdivided by one or more support tasks.

Click on the desired task and then scroll to the bottom.

Step 2 – Create a support task

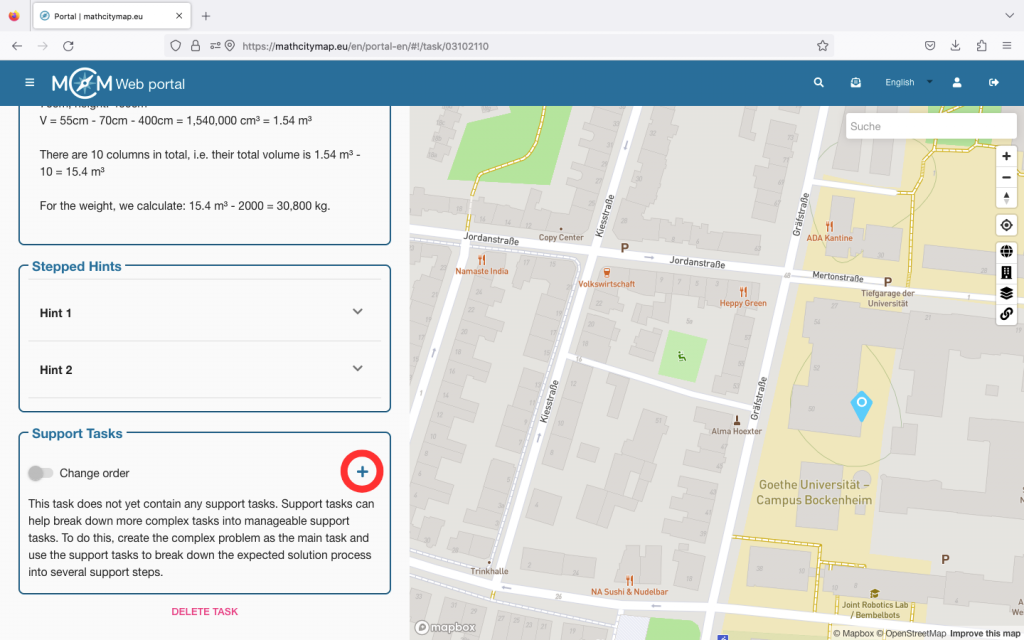
You will see a box with the title “Support tasks”. Click on the plus symbol on the right-hand side to create a new support task.

You will then be asked to enter all the basic information again, as when creating the main task.

You only do not need to enter the location, as this is the same as the one of the main task.

Once you have entered all the information, click on “Create”.

Step 3 – Multiple support tasks

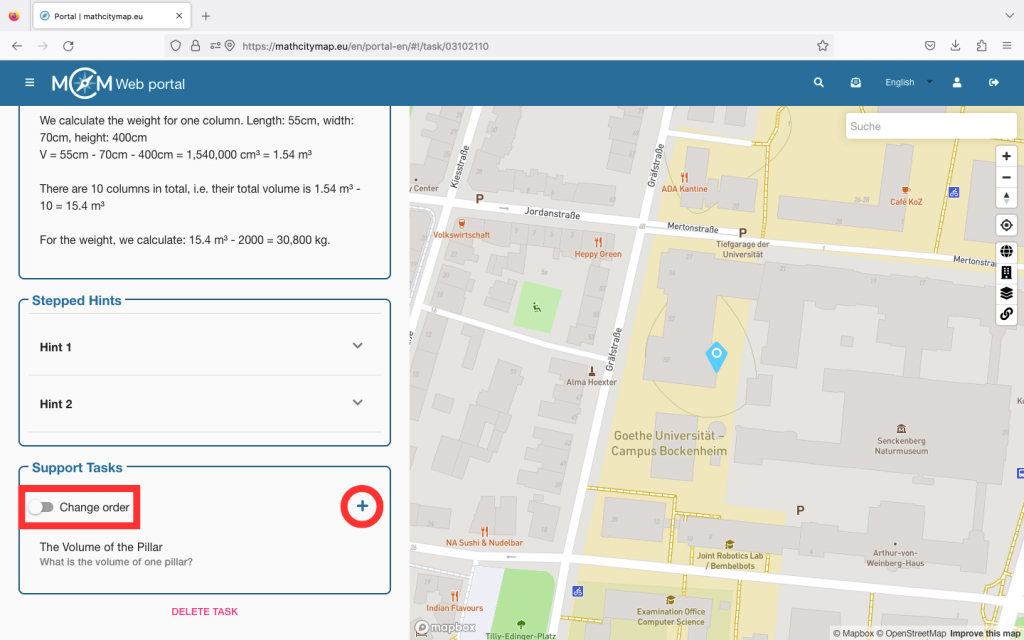
For complex tasks, it can be helpful to create several support tasks. To do this, click on the plus symbol again and create another support task.

You can then determine the order in which the tasks should be processed. To do this, click on the “Change the order” button and move the support tasks so that they are in the right place.

Then confirm that you want to save the changes.

Further Tutorials

Create a Digital Classroom

In the MathCityMap web portal, a digital classroom can be set up for a math trail, offering organizational and educational tools. Here you will find a step-by-step guide to creating a digital classroom:

Step 1 – Select an Existing Trail

To select an existing trail, click on the “Trails – Create and Manage” field. You can also click on “Trails” in the menu bar on the left.

A view with your trails will open. Click on the desired trail to open its detailed view.

You can also create a digital classroom with public trails. Click on the desired trail to open its detailed view.

Step 2 – Switch to the “Digital Classroom” area

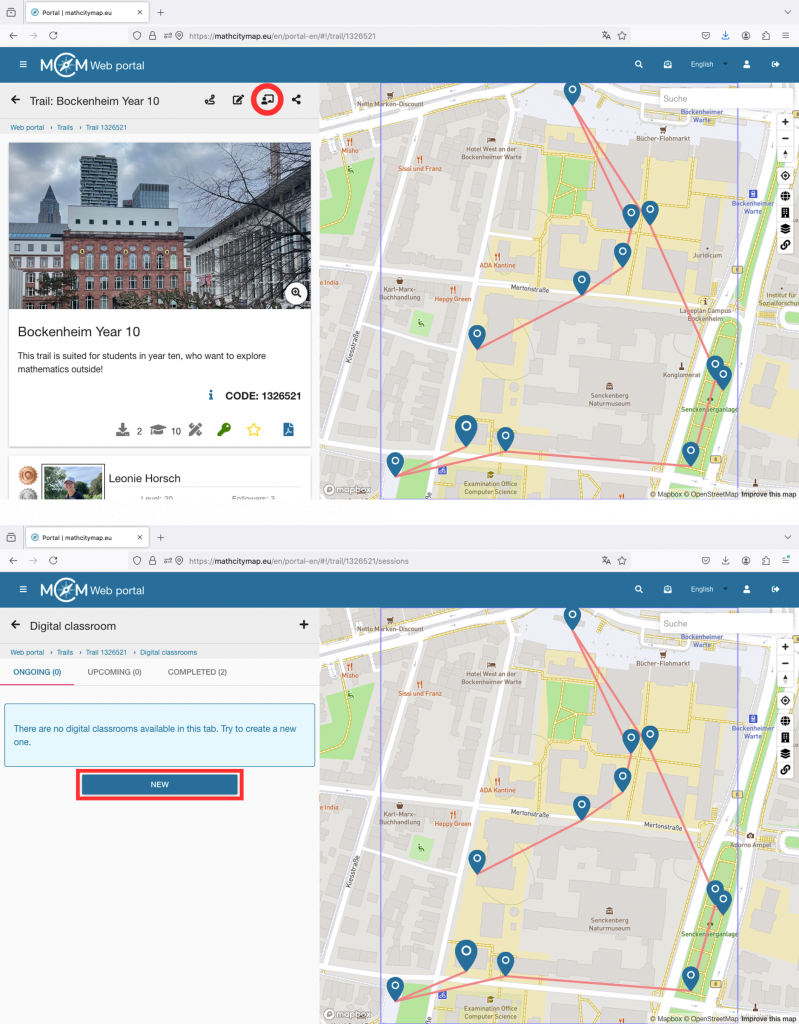
In the top left, you will see an icon showing a figure in front of a blackboard. Click on it to open the digital classroom section.

Here, you’ll see an overview of already created classrooms (if any), as well as a “New” button to create a new digital classroom.

Step 3 – Create a new digital classroom

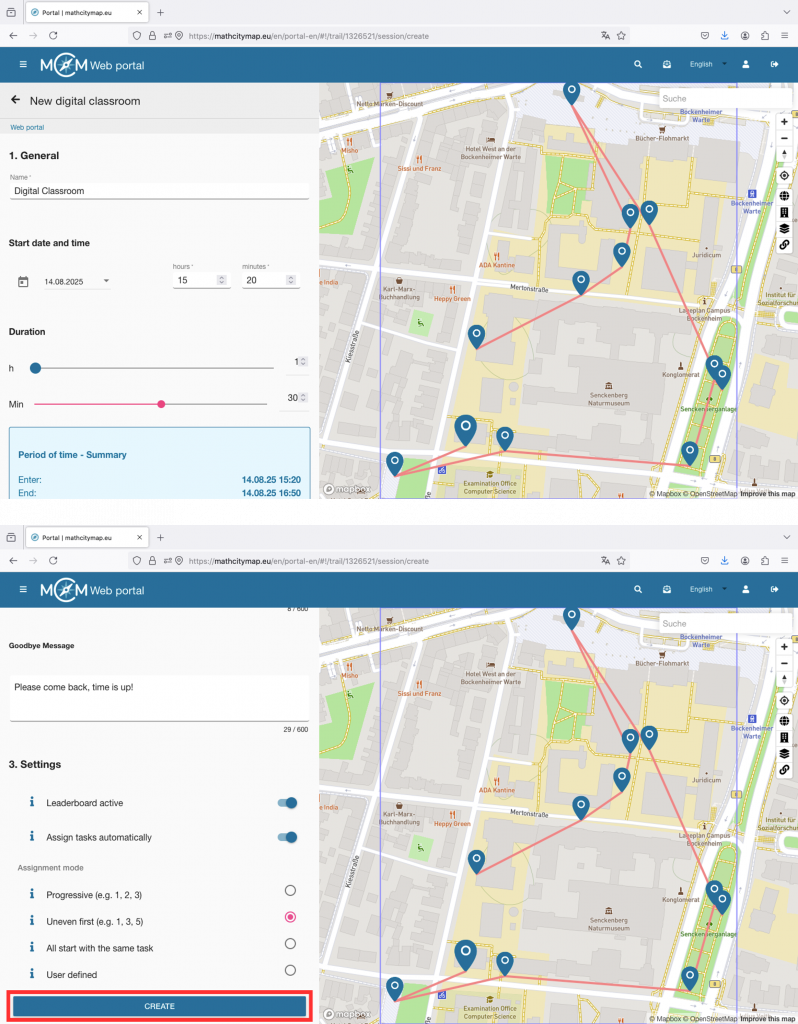
After clicking “New,” the digital classroom editor will open.

First, fill out the general information: The name of the digital classroom will be displayed to the learners in the app, select the date and time for the session (learners can join 30 minutes before the start), and set the duration of the digital classroom (after the time has expired, the session will end for all participants).

You can also write a welcome and farewell message. These will be shown to all participants at the beginning and end or when leaving the session.
In the settings, you can enable or disable the leaderboard. The leaderboard is a local ranking list and shows your team’s score, as well as the score of the team ahead and the team behind.

With the automatic task assignment feature, you can control whether all participants should start with the same task or whether they should first spread out among the tasks.

Click on “Create” to save the settings. The digital classroom will then appear under “Ongoing” or “Upcoming” depending on the start time. In the square brackets, you’ll find the associated code starting with an “s.” Share it with your learners so they can join the digital classroom.

Weitere Anleitungen

Functions in a Digital Classroom

The trail of a digital classroom works like the regular trails, but there are some additional functions. These are explained in more detail in the following steps:

Step 1 – Session Information

Below the title of the trail, you can see how much time you have left to complete the trail, so you know when the session or digital classroom will finish.

You will also find a list of the other teams and their current scores so you can compare yourself with them during the session. 

Step 2 – Task Overview

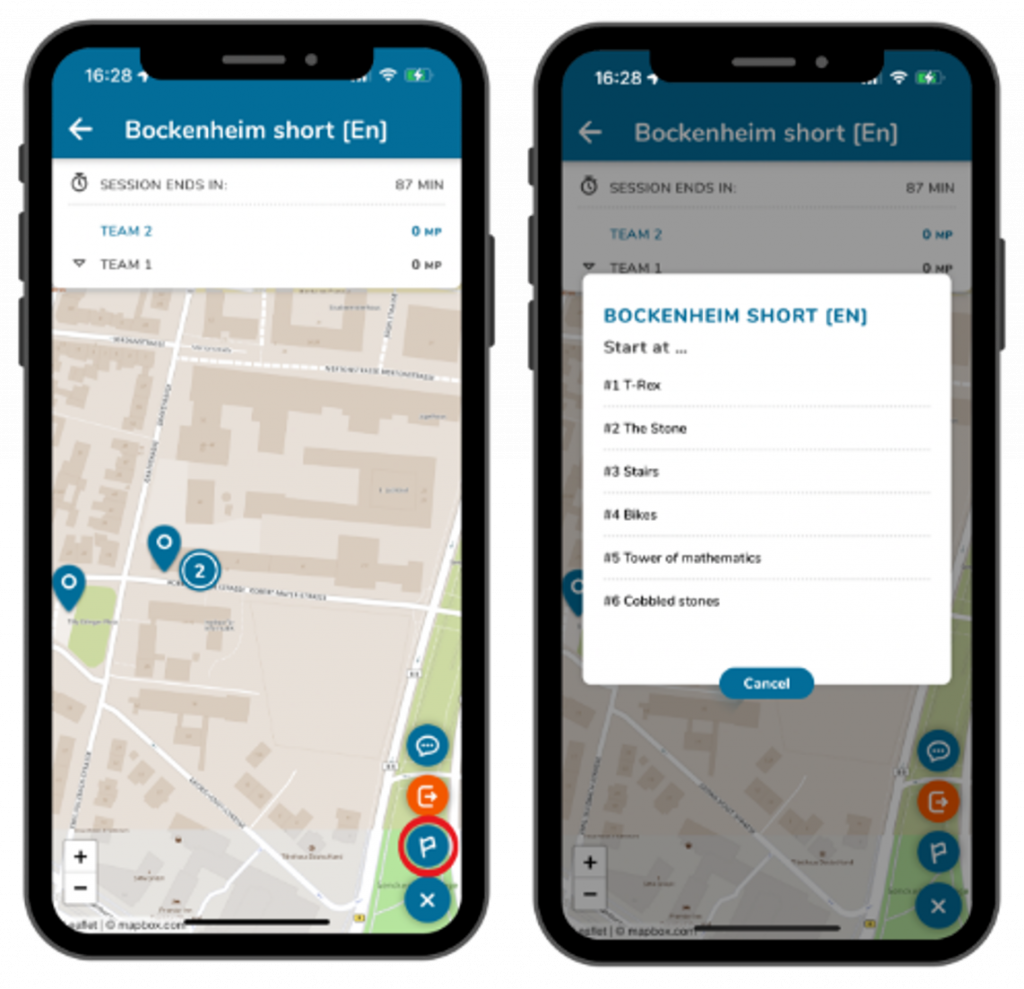
Click on the three dots at the bottom right to use other functions of the digital classroom.

For example, you can get an overview of the trail tasks by clicking on the flag icon. You can then select a starting task if this has not been selected already.

The blue flag symbol then turns into an orange eye symbol. If you click on it, all the tasks on the map will be displayed again. 

Step 3 – Chat Function

 
You can contact the person leading the session during the digital classroom. To do this, click on the three dots at the bottom right and then on the speech bubble icon.

You can write messages, record voice messages and send photos.

The person leading the session can reply to you in the chat and the messages sent to all participants will also appear there. 

Step 4 – Quit Session

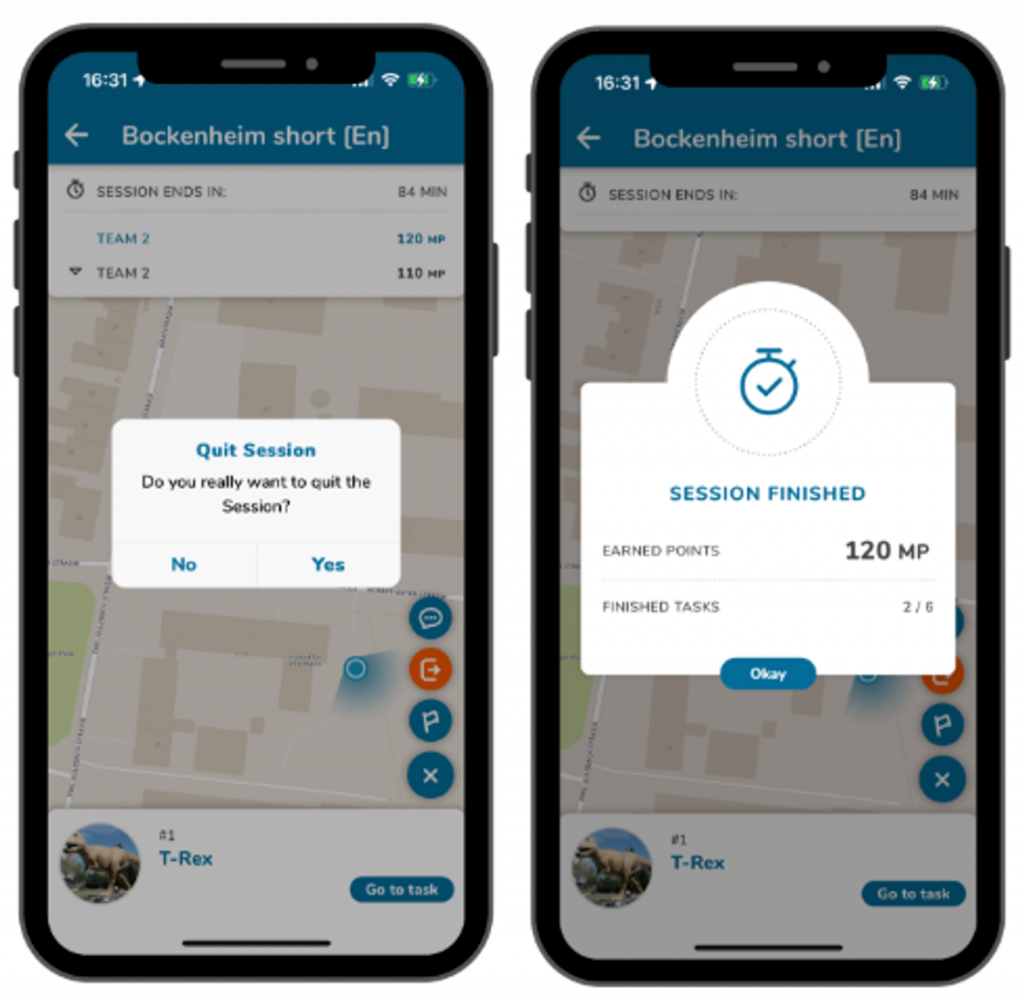
If you want to leave the session early, click on the three dots and then on the orange exit symbol.

Confirm with “Yes” to end the session. 
You will then be given a summary of your achieved score and completed tasks.

Further Tutorials

Add Trails from a Digital Classroom

To add the trail of a digital classroom in the app, you need a specific code. Here is a step-by-step guide on how to add it:

Step 1 – Open the Trails Section

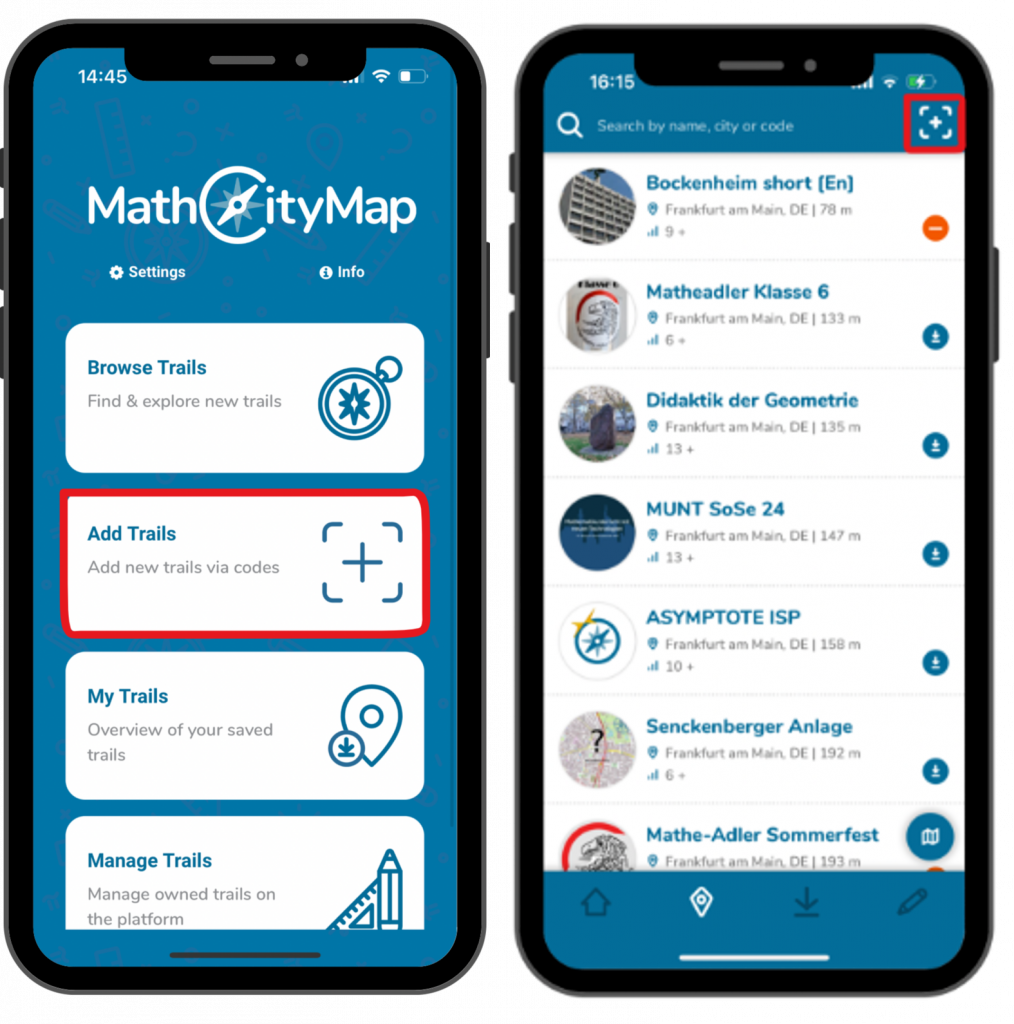
Click on the “Add trails” field on the start page or on the plus symbol at the top right under “Browse trails”.

A window will open with the title “Private Trail or Session”. 

Step 2 – Enter the Code

Codes from digital classrooms differ from codes from regular trails in that they start with an “s”.

You will receive the required code from the person leading the session.
Enter the code and then click “Add”. 

Step 3 – Accept Terms and Conditions

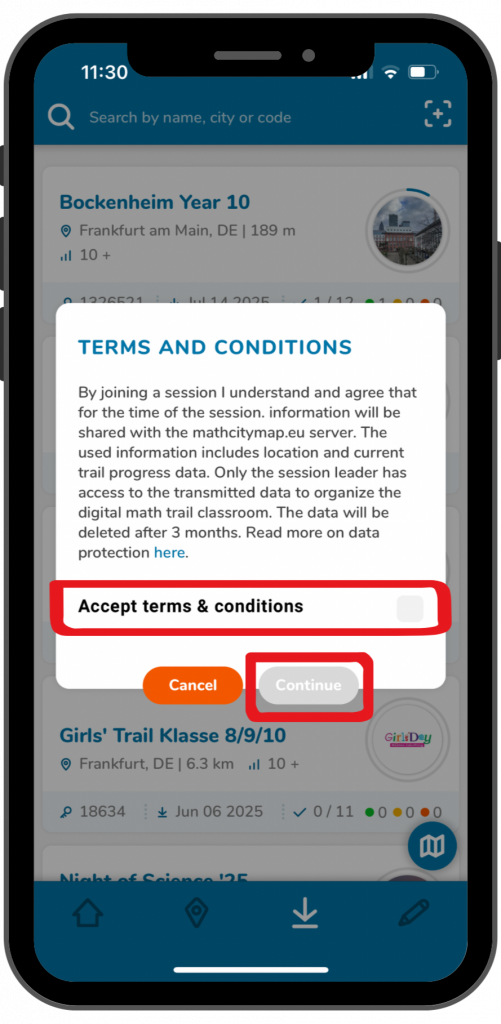
In the digital classroom, the person leading the session receives information about the location and trail progress of the participants.

Participation in the digital classroom is only possible if these terms of use are accepted.

To do this, place a tick next to “Accept terms of use” and then click on “Continue”. 

Step 4 – Team Name

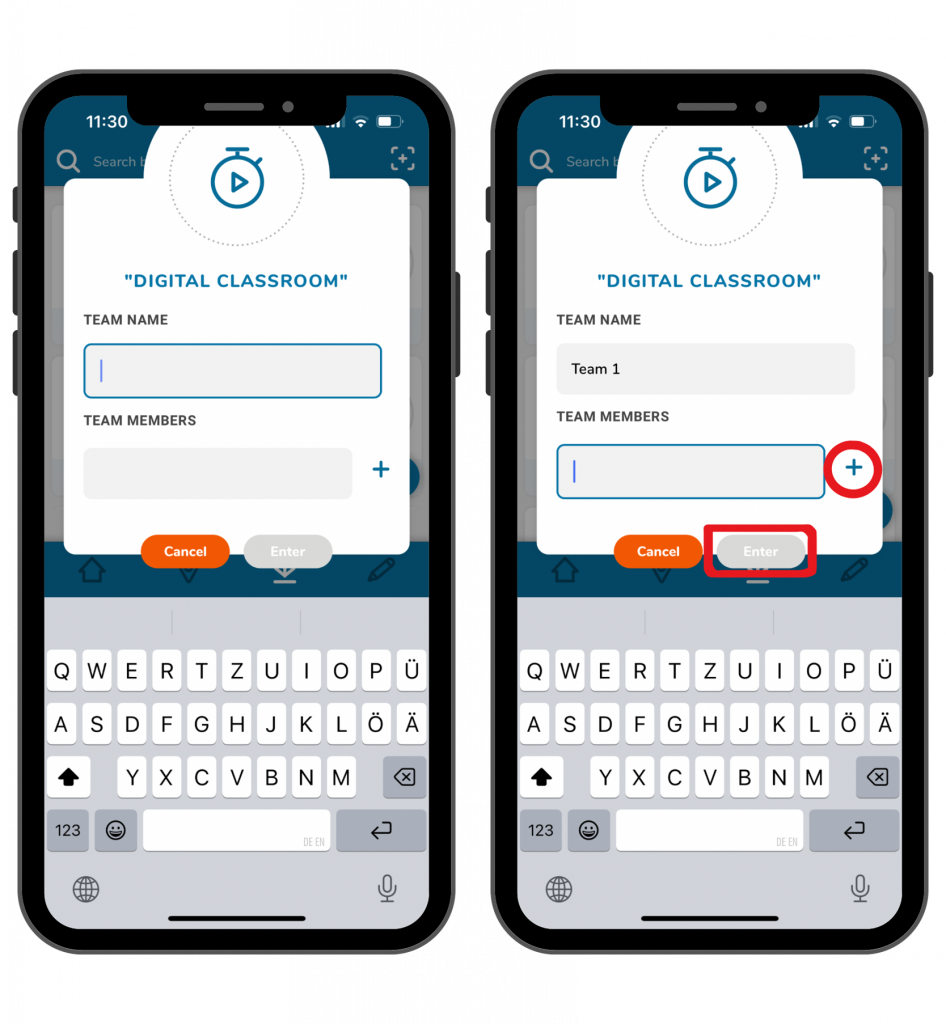
Choose a team name in your group and put it in the first field.

Enter the names of your team members in the second field. Click the plus symbol to add additional members.

Then click “Enter” to join the session.  

Step 5 – Download Trail

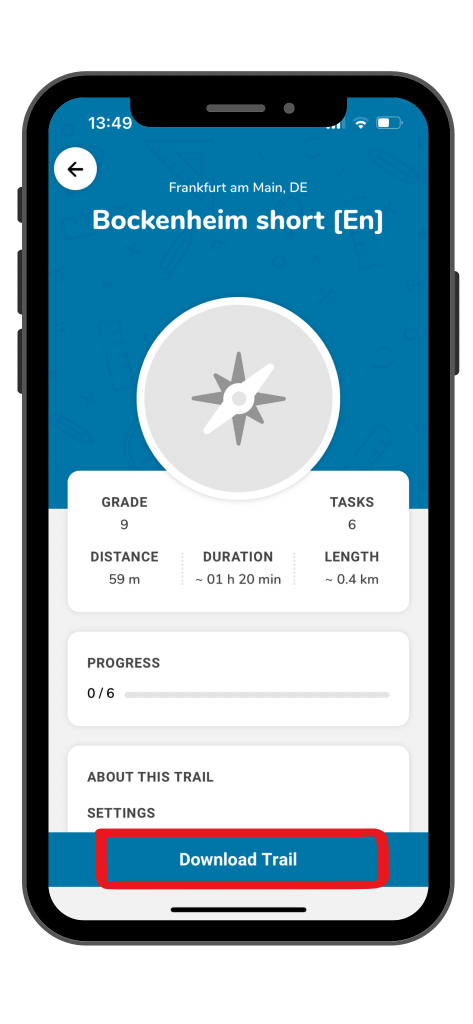
You will be shown all the important information about the digital classroom trail.

Click on the blue “Download trail” button at the bottom of the screen to save the trail. 

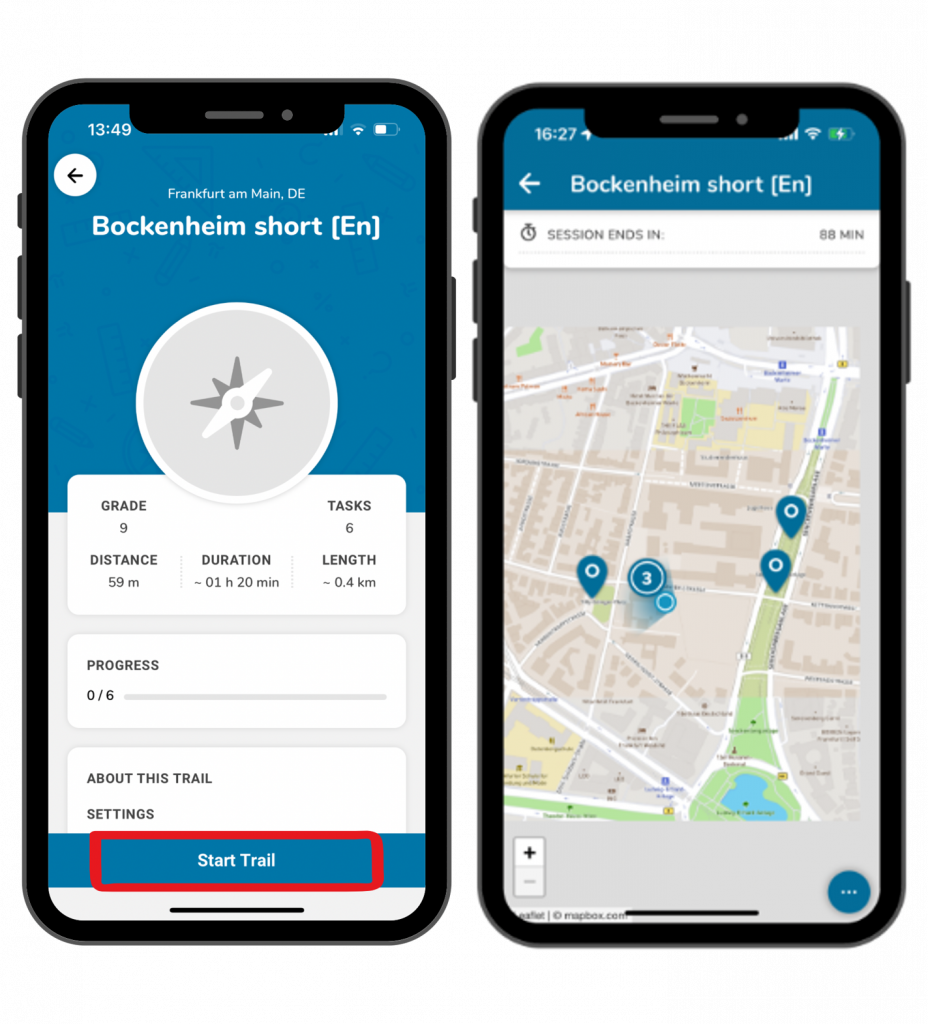
Step 6 – Start the Trail

The blue button then changes to “Start trail”. Click on it to start walking the trail.

A map view with the tasks will open. 

Further Tutorials

Task-Wizard

The task-wizard is a helpful tool to make the creation of tasks in the MathCityMap web portal easier and faster. It works for some of the standard tasks. Before using it, you must have already thought about the task and collected measured values. Here is a step-by-step guide on how to use the task-wizard:

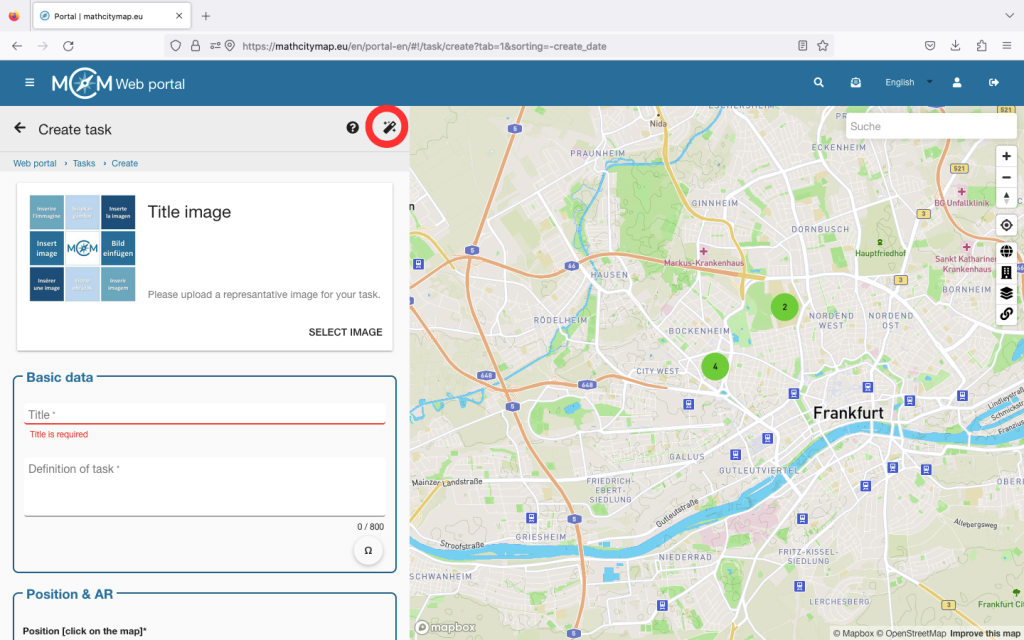
Step 1 – Open the task-wizard

When you create a task, you will see a magic wand icon in the top right-hand corner. Click on this to open the task-wizard function.

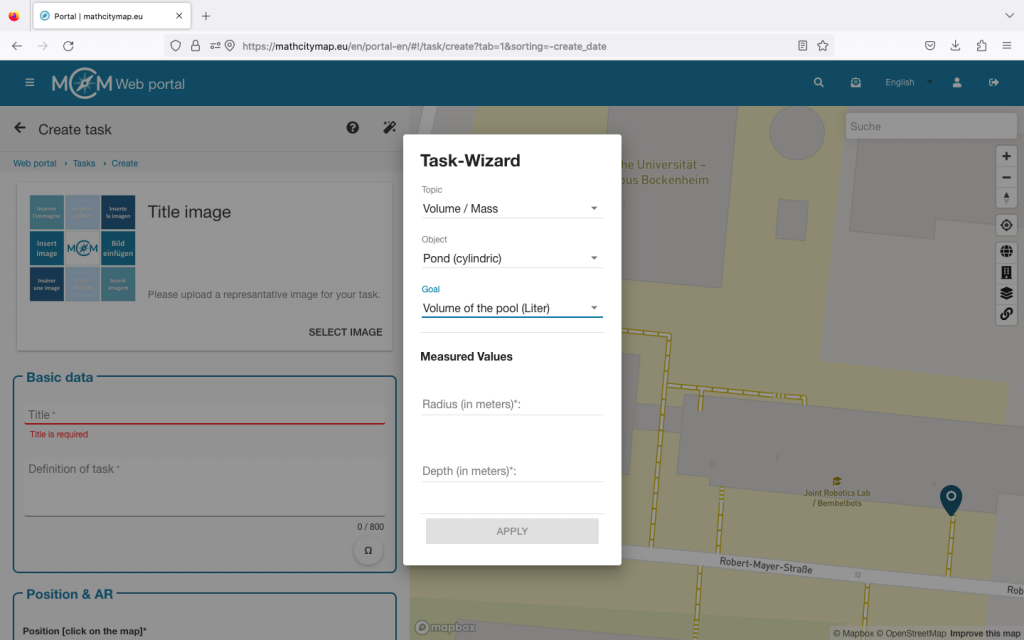
Step 2 – Enter basic data

First select a suitable topic for your task.

You can then select an object that matches the topic.

Then you need to specify what you are looking for in your task.

Fields will then open in which you should enter your measured values.

Once you have entered everything, click on “Apply”.

Step 3 – Check and complete the data

The task-wizard automatically formulates a suitable task and also creates the sample solution and appropriate hints.

Think about whether you want to adjust the title and add a cover image.

Click on the position on the map where your object is located and click on “Create” at the end.

Further Tutorials

App Settings

The settings help you with an optimal use of the MathCityMap app. Here are a few steps to different settings:

Step 1 – Open Settings

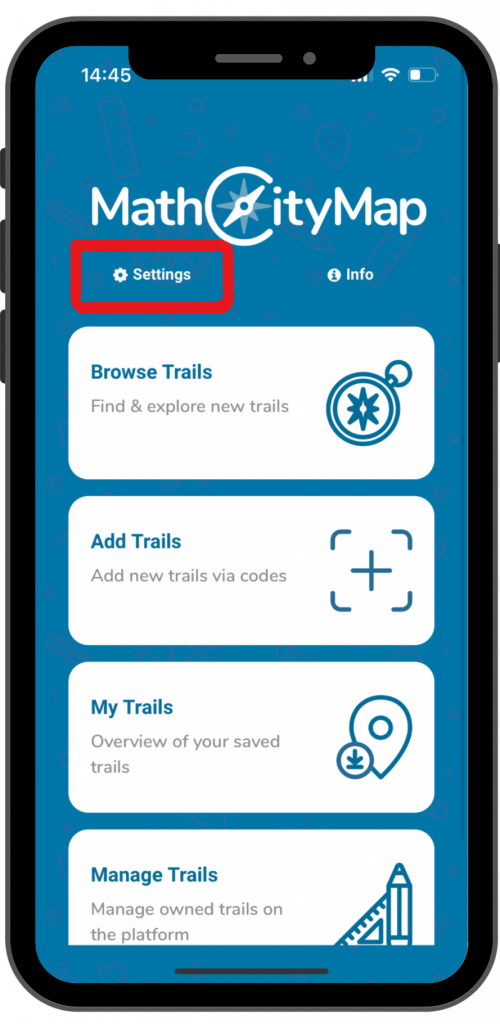
Click on “Settings” at the top left of the start screen. There is also a cogwheel symbol next to it.

This opens a view with various setting options. 

Step 2 – Tutorial

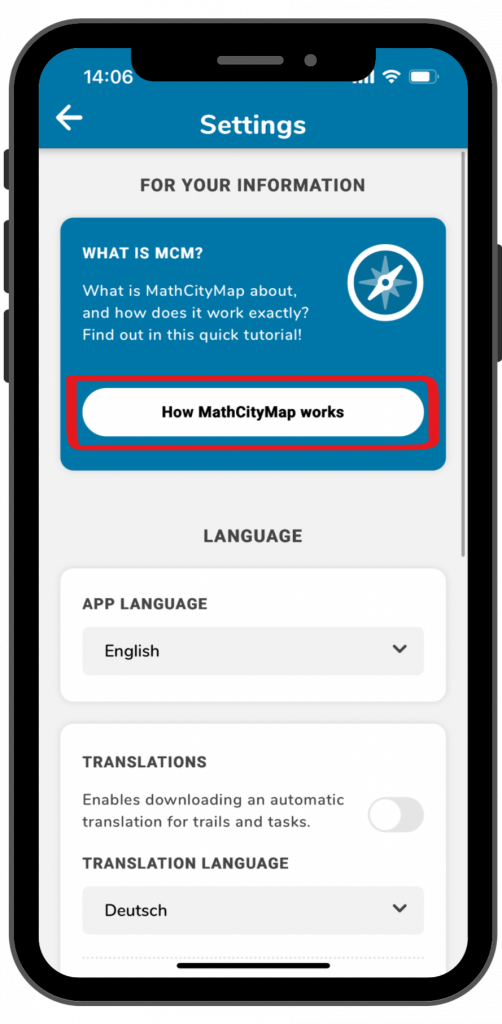
There is also a short explanation of how to use the app directly in the app. Click on the blue field “How MathCityMap works”.

The tutorial will open and you can switch to the next page by swiping.

When you are finished, click on the cross at the top right and you will be taken back to the settings.  

Step 3 – Language

 
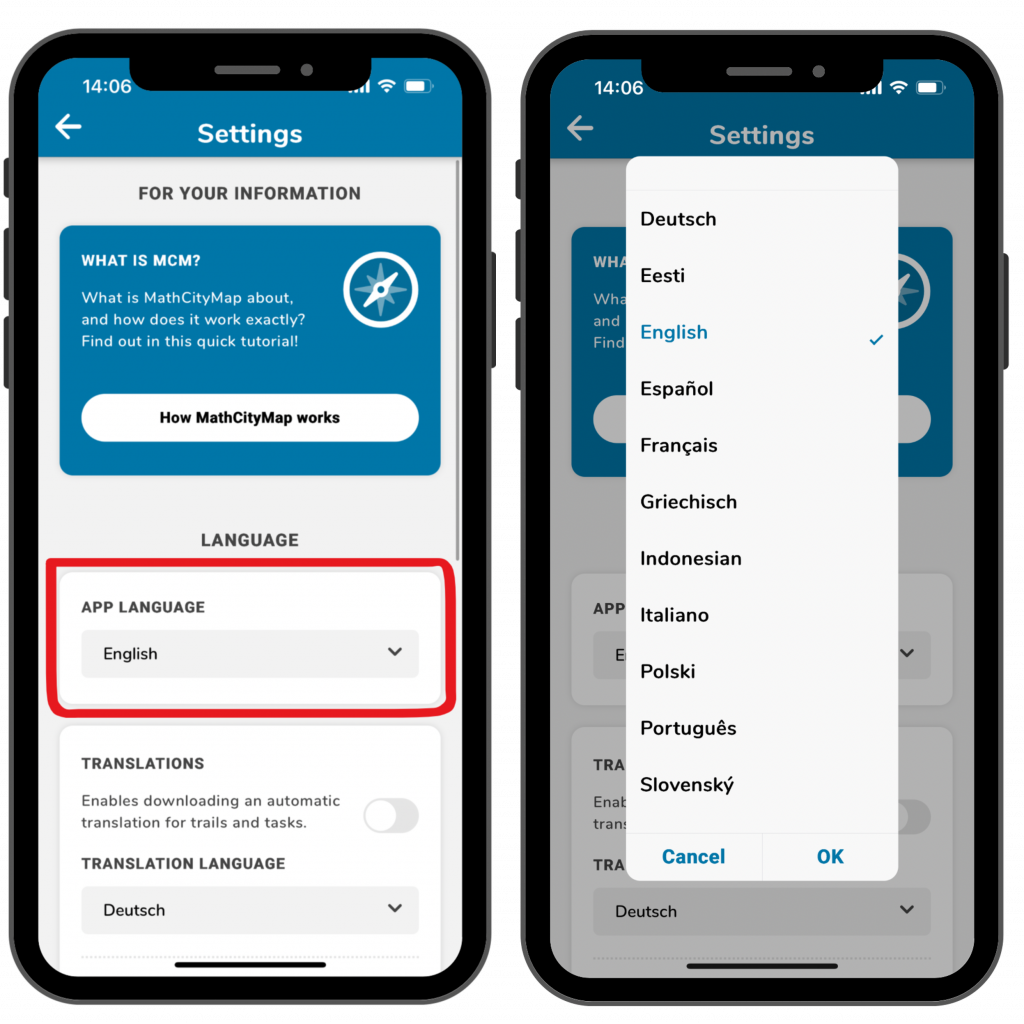
The language of the app is initially set to English if you have downloaded it via an English app platform. However, you can of course also use it in other languages.

To do this, click on the selected language under “Language” and select a different one.

Confirm with “Ok” and the app will automatically update all texts and menus. 

You can also get a translation for trails and tasks. Look at the tutorial “Automatic Translations” for further information.
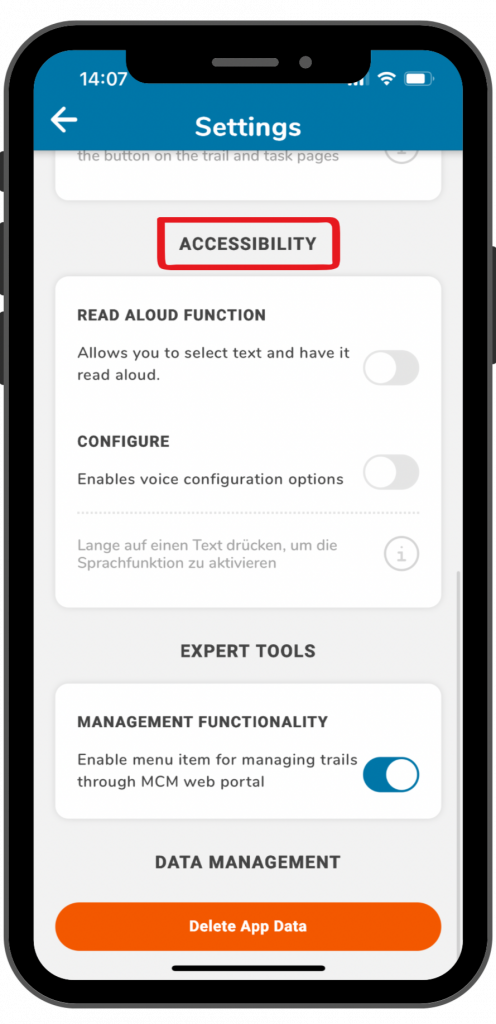
Step 4 – Accessibility

In the app you can use a read aloud function for trail information and task definitions.

Look at the tutorial “Read Aloud Function” for further information.
Step 5 – Expert Tools

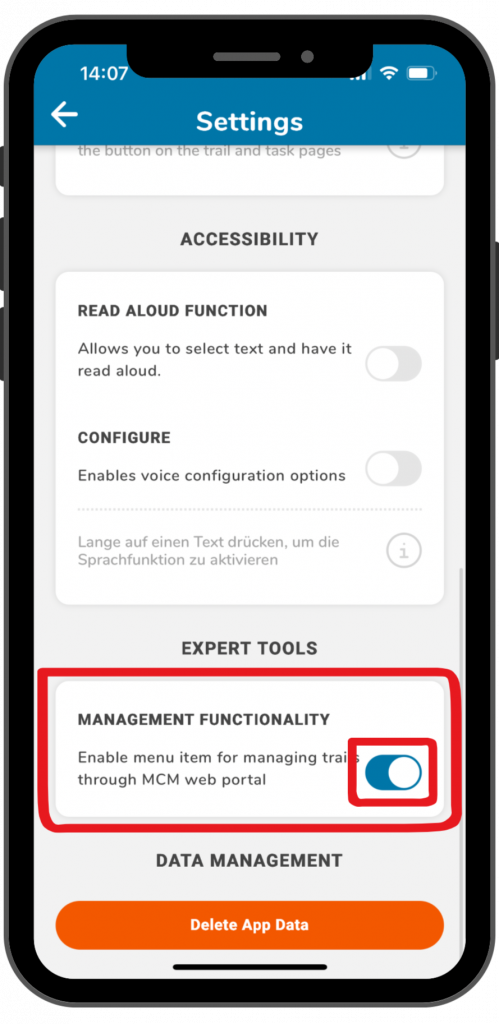
The menu item for managing trails is not yet activated in the default settings.
If you also want to use the MathCityMap web portal via the app and thus manage your trails, you must activate the slider under “Management functionality”.

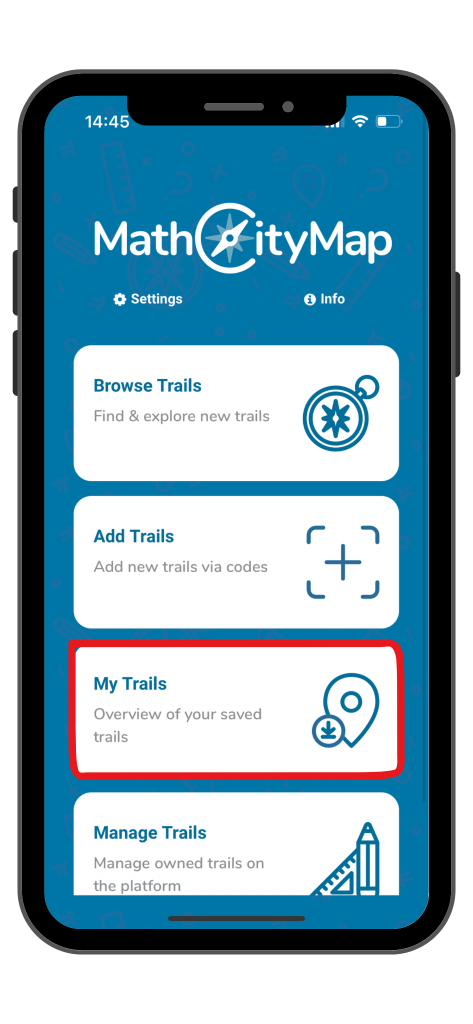
You can then select the fourth menu item on the start page.  

Step 6 – Data Management

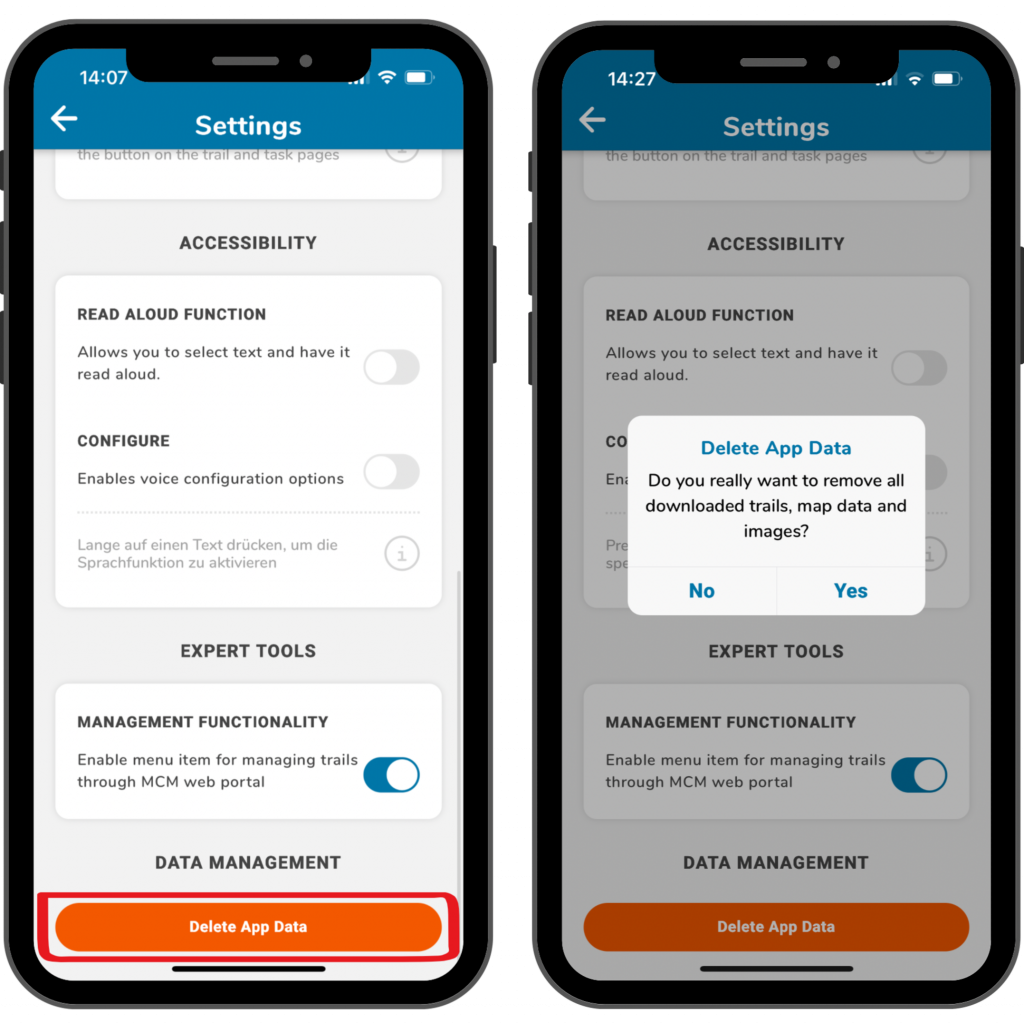
If you want to delete your app data, click on the orange “Delete App Data” field at the bottom.

This will reset the app to the default settings and delete all saved trails, map data and images.

Confirm with “Yes” or click on “No” if you want to keep your data.

You can also view your saved trails and delete individual ones.

Further Tutorials

My Trails

Under “My trails” you will find all the trails that you have downloaded or already completed. Here is a step-by-step guide to managing your saved trails:

Step 1 – Open the Trail area

Click on the “My trails” field on the start page.

A page with your saved trails will open, sorted by the distance from your current location.     

Step 2 – Basic Information about the Trails

On this page, you can already see important information about the trails, such as the title, the location with the distance to you and the class level.

Next to the key symbol you will find the corresponding code if you would like to recommend the trail.

Next to the download symbol you will see the date on which you downloaded the trail.

You can also see how many of the tasks you have completed with the level of satisfaction by the numbers next to the different colors next to the tick symbol.  

Step 3 – More Information

 
Click on any trail to get more detailed information.

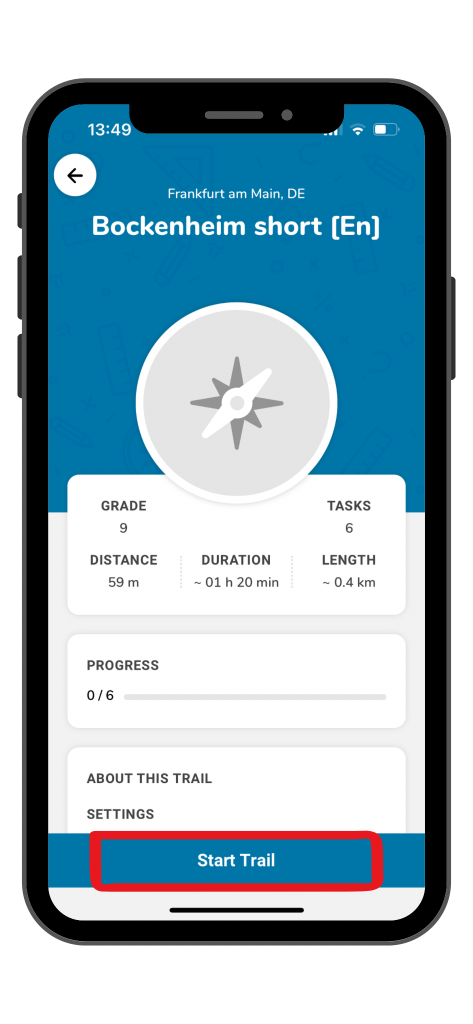
Here you will see additional information about the duration and length of the trail, as well as the settings, required tools and suitable keywords.

Click on the blue field at the bottom of the screen to start or continue the trail.  

Step 4 – Remove Trails

To remove a trail from your saved trails, click on it and scroll down to the black “Remove trail” field.

When you remove it, your progress is automatically deleted, including all solutions to tasks you have already completed.

If you want this to happen, click on the field and then confirm the removal by clicking “Yes”. 

Further Tutorials