AR Tasks

MathCityMap tasks can also contain augmented reality elements. This provides MCM users with visual and interactive tools to make the tasks even more interesting. Here is a step-by-step guide to creating AR tasks:

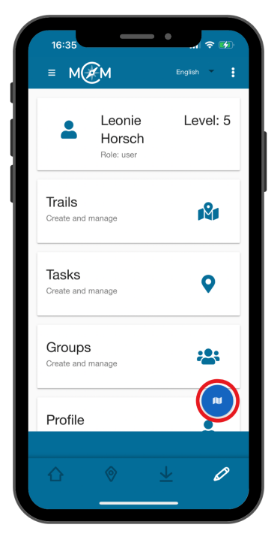
Step 1 – Create Task

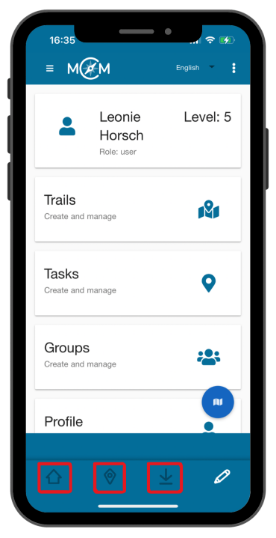
Under “Tasks – Create and manage”, click on the plus symbol and on “New task”.

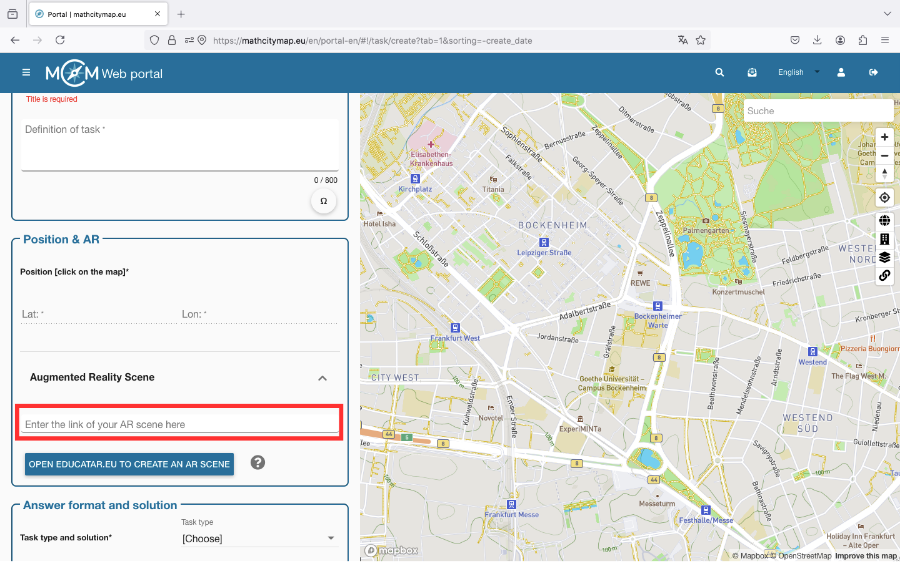
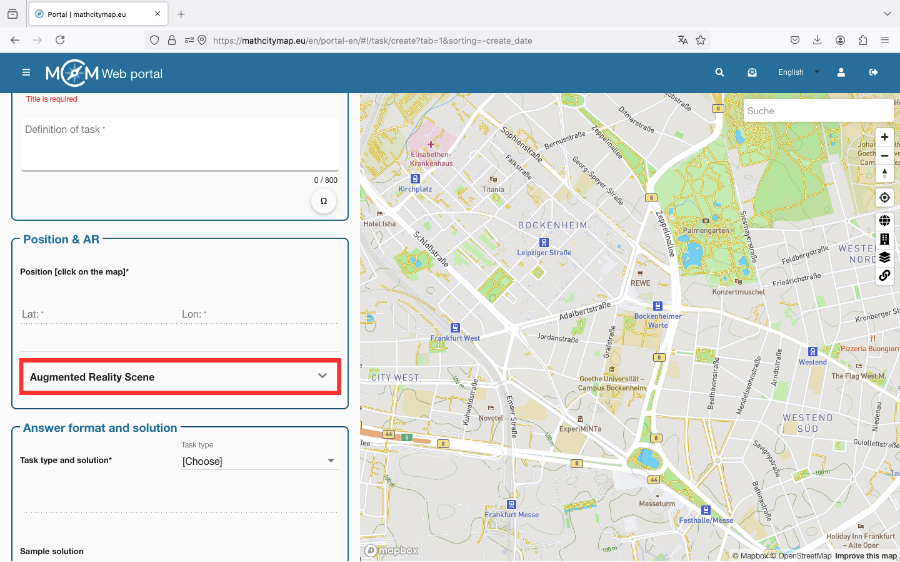
To add an augmented reality scene to a task, you must then click on the “Augmented reality scene” field in the “Position & AR” box.

Step 2 – Create AR Scene

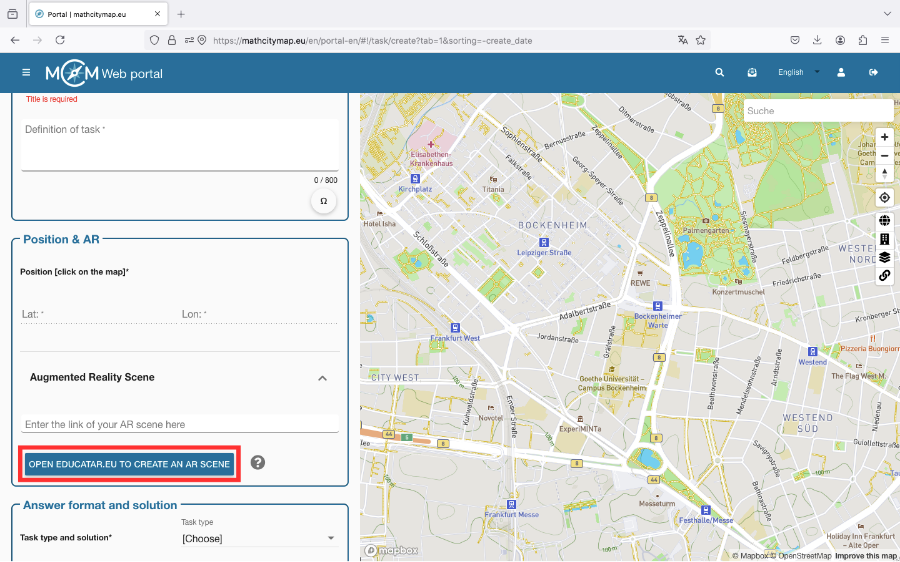
Click on the “Open Educatar.eu for a new AR scene” box. You will be redirected to the Educatar.eu website.

There you can create an augmented reality scene that allows you to display virtual content (text, images, etc.) against a real background using a smartphone.

You can find a detailed tutorial on this under this Link (Website MaSCE³-Project).

Step 3 – Insert link in MCM

Once you have created a scene on educatar.eu, you can enter the URL of the scene in the appropriate field.

MCM users can then open it via the MCM app. 

Further Tutorials

Profile

Your profile in the MathCityMap web portal contains personal data and statistics on your activities in the portal. Other MCM users can find out which tasks you have published, for example. Here is a more detailed description of how you can use your profile.

Step 1 – Open Profile

To open your profile, click on the “Profile – Personal data, statistics” field on the start page. You can also select this from the menu bar on the left.

You will then see your name, your profile picture and your timeline.  

Step 2 – Edit Profile

If you want to edit your profile, click on the pencil icon in the top right-hand corner.

Here you can add a profile picture or specify your occupation and add awards.

Click on “Save changes” to save your settings.  

Step 3 – Activities in the Portal

In your timeline, you can see your activities in the portal in chronological order. The most recent activity is always displayed at the top.

In addition to your timeline, you can also view your public tasks and trails separately. This can be a helpful view when searching or sharing.

You can also see who you have subscribed to and your subscribers. If you follow someone, you will be informed about their activities in your newsfeed and vice versa.  

Step 4 – Awards

You can earn various awards by participating in the web portal. You will find all possible awards and those you have already achieved under the medal symbol.

As soon as you have received one or more awards, you can also add them directly to your profile so that they appear next to your profile picture. To do this, click on the pencil icon.

You can select up to three awards and decide whether they should be in first, second or third position.

Finally, confirm by clicking on “Save changes”. 

Step 5 – Profiles of other Members

All public tasks and trails are always accompanied by the name of the person who created them. By clicking on the person’s name, you will be taken to the corresponding profile.

This is basically structured like your own, but you will find additional icons at the top right.

You can follow and unfollow a person by clicking on the bell icon.

If you want to request a person’s contact details, you need to click on the business card symbol. The other person must first agree to the transfer, so it may take some time before you receive it.

You can also leave a public message on the person’s timeline. To do this, click on the paper airplane icon and enter your message.  

Weitere Anleitungen

Manage Learning Groups

You can edit your learning group at a later point or monitor the progress of your learners. Here is a step-by-step guide to managing your learning group:

Step 1 – Edit Learning Group

Click on the learning group that you want to edit.

You will see a plus symbol at the top right. This allows you to add new learners to your learning group.

If you click on the edit symbol, you can edit the title and abbreviation of your learning group.

You can also delete the learning group here if necessary.  

Step 2 – Tasks of the Learning Group

You can see which tasks have already been created and by whom.

Either click on individual learners to see their progress or click on “Learning group tasks” to see all the tasks that have already been created.

Click on a task to see more details. 

Further Tutorials

Community

Partner schools play an important role in the MathCityMap project. These schools create new tasks themselves and put the concept of outdoor math learning into practice. In the web portal, teachers can join their school and participate in joint activities.

Step 1 – Partner schools

Click on the “Community – Partner schools and activities” field on the homepage or select “Community” in the menu bar on the left-hand side.

A list of partner schools will open, sorted in alphabetical order according to the country in which they are located.

If you click on a school, you will find an e-mail address as a contact and the location of the partner school.

Students and teachers can also join their school.  

Step 2 – Activities

There are various activities that teachers from partner schools can take part in to learn about the development of the project or to have the various applications explained to them.

To see if and when an activity is offered, click on “Activities” under “Community”.

Then click on the desired activity. If you are authorized to participate, the field “Participate in this activity” will appear.

Step 3 – Become a new Partner School

To become a partner school, you need to create 15 tasks and two trails for different grades near your school.

These should be published in our system and reviewed by the school’s math teachers.

They should also have been downloaded at least five times by learners.

If these conditions are met, an application to become a partner school can be sent to info@mathcitymap.eu.

This should contain the codes of the trails as well as a short report on the experience with MCM.

Further Tutorials

Webportal in the App

The MathCityMap web portal can also be used directly via the app. This allows you to access and manage created content such as tasks and trails. Here is a step-by-step guide to accessing and using the web portal in the app:

Step 1 – Open the Webportal

To be able to use the web portal in the app, you must first activate the management option in the settings.

Then you can click on the “Manage trails” field on the start page. The web portal and a login window will open.  

Step 2 – Log in to the Webportal

If you already have an account in the MathCityMap web portal, you can sign in directly.

Otherwise, you can register.

You can also continue without logging in, but then you will not be able to use all the functions of the portal. 

Step 3 – Functions of the Webportal

 
You can use the web portal via the app in the same way as you do via the browser. Only the view is slightly different when using the smartphone.

Here you will find the menu fields in list form and can switch to the map view by clicking on the map symbol at the bottom right.

You can also switch back to the menu view by clicking on the list icon.  

Step 4 – Manage Content

In contrast to using the web portal on a tablet or laptop in the browser, you will find the various management options for your content under the three dots at the top left if you have clicked on a task, a trail or a group.  

Step 5 – Exit the Webportal

You can return to the various app functions by clicking on one of the symbols in the lower blue field.

The house icon stands for the start page of the app, the location icon for searching for trails and the download icon for your saved trails.

Further Tutorials

Functions in a Digital Classroom

The trail of a digital classroom works like the regular trails, but there are some additional functions. These are explained in more detail in the following steps:

Step 1 – Session Information

Below the title of the trail, you can see how much time you have left to complete the trail, so you know when the session or digital classroom will finish.

You will also find a list of the other teams and their current scores so you can compare yourself with them during the session. 

Step 2 – Task Overview

Click on the three dots at the bottom right to use other functions of the digital classroom.

For example, you can get an overview of the trail tasks by clicking on the flag icon. You can then select a starting task if this has not been selected already.

The blue flag symbol then turns into an orange eye symbol. If you click on it, all the tasks on the map will be displayed again. 

Step 3 – Chat Function

 
You can contact the person leading the session during the digital classroom. To do this, click on the three dots at the bottom right and then on the speech bubble icon.

You can write messages, record voice messages and send photos.

The person leading the session can reply to you in the chat and the messages sent to all participants will also appear there. 

Step 4 – Quit Session

If you want to leave the session early, click on the three dots and then on the orange exit symbol.

Confirm with “Yes” to end the session. 

You will then be given a summary of your achieved score and completed tasks.

Further Tutorials

Add Trails from a Digital Classroom

To add the trail of a digital classroom in the app, you need a specific code. Here is a step-by-step guide on how to add it:

Step 1 – Open the Trails Section

Click on the “Add trails” field on the start page or on the plus symbol at the top right under “Browse trails”.

A window will open with the title “Private Trail or Session”. 

Step 2 – Enter the Code

Codes from digital classrooms differ from codes from regular trails in that they start with an “s”.

You will receive the required code from the person leading the session.

Enter the code and then click “Add”. 

Step 3 – Accept Terms and Conditions

In the digital classroom, the person leading the session receives information about the location and trail progress of the participants.

Participation in the digital classroom is only possible if these terms of use are accepted.

To do this, place a tick next to “Accept terms of use” and then click on “Continue”. 

Step 4 – Team Name

Choose a team name in your group and put it in the first field.

Enter the names of your team members in the second field. Click the plus symbol to add additional members.

Then click “Enter” to join the session.  

Step 5 – Download Trail

You will be shown all the important information about the digital classroom trail.

Click on the blue “Download trail” button at the bottom of the screen to save the trail. 

Step 6 – Start the Trail

The blue button then changes to “Start trail”. Click on it to start walking the trail.

A map view with the tasks will open. 

Further Tutorials

Walk a Trail

Once you have selected and downloaded a suitable trail, you can walk it and complete the various tasks. Starting from the standard settings, here is a step-by-step guide to walking the trail:

Step 1 – Preparation

Before starting the trail, gather any measurement tools you might need. The trail’s information will specify which tools are required.

If you’ve already downloaded the trail, no internet connection is necessary outdoors.

Step 2 – Navigate to the First Task

Egal ob du dir eine Startaufgabe aus der Liste oder direkt von der Karte ausgewählt hast, es wird dir dein aktueller Standort und der Standort der Aufgabe angezeigt.

Laufe nun zu der ersten Aufgabe, das Titelbild hilft dir dabei den genauen Ort zu bestimmen.

Klicke unten auf dem Bildschirm auf das blaue Feld “zur Aufgabe”, damit du die Fragestellung lesen und mit dem Bearbeiten beginnen kannst. 

Step 3 – Solve the First Task

Take the necessary measurements and calculate your solution.

Enter it in the answer field and click “Check” to save it.

You’ll receive feedback on whether the task was solved correctly. 

Step 4 – Feedback

If you have solved the task correctly, a green tick will be displayed and you will receive the full score.

You may receive an orange tick for tasks with a solution interval, for example. In this case, your answer is within a satisfactory range, but could be more accurate.

A red X is displayed if the task has not been solved correctly. You then have the option of entering a new solution. If you enter several incorrect solutions, points will be deducted from the task. 

Step 5 – View Sample Solution

After solving a task or exceeding the allowed attempts, you can view the sample solution. To do this, click on the “Sample solution” field.

There you can see, for example, whether there are alternatives to your solution. If you are in the yellow range of the solution, you can see where you may have made measurement or calculation errors. 

Step 6 – View Hints

If you are stuck on a task, the step-by-step hints can be helpful.

Click on the light bulb symbol to display a hint.

Then try to find a solution or, if necessary, look at the next clue.

Step 7 – Move to the Next Task

Once the solution is accepted, a button will appear prompting you to proceed to the next task.

Click “Next Task” to display the map and the next recommended task.

You can click “Go to Task” or choose a different one. 

Step 8 – Skip a Task

If you cannot solve a task or want to return to it later, you can skip the task.

Click the orange arrow and confirm by selecting “Yes”.

The skipped task will appear as a grey arrow on the map, reminding you to revisit it later. 

Step 9 – Access Additional Features

Clicking the three dots at the bottom opens additional features.

Firstly, you can click on the blue flag symbol. This will give you an overview of the trail’s tasks and you can also select which one you would like to work on next.

Secondly, you can click on the orange arrow symbol. This allows you to reset your progress on the tasks. If you want to do this, you must click on the arrow symbol and then confirm with “Yes”.

If you click on the X, these two fields will disappear, and the three dots will be displayed again. 

Step 10 – Finish the Trail

Once you have completed all the tasks, you can finish the trail. You can also pause the trail at any point.

To leave, click on the white arrow at the top left corner.

Your score is displayed at the top and you can also see your progress in the trail information. 

Further Tutorials

Download and Start a Trail

To walk a trail, you must first download and then start it. Once downloaded, no internet connection is needed. Here’s a step-by-step guide for downloading and starting trails:

Step 1 – Downloading via Browse Trails

When trails are displayed in list format, click the download icon on the right to download the trail.

Alternatively, click on the trail to view its details first.

At the bottom of the screen, click “Download Trail” to save it.

If you’re searching for a trail on the map, you’ll find a download icon on the right as well or in the trail’s detail view. 

Step 2 – Downloading via Add Trails

After adding a trail, its information will be displayed.

At the bottom of the screen, click “Download Trail” to save it. 

Step 3 – Start the Trail

Once the trail is downloaded, the blue button at the bottom of the screen changes to “Start Trail.” Click it to begin.

You’ll be asked if you want to start from a specific task. This is useful when multiple groups are participating, so they do not all begin at the same point.

Clicking “Yes” lets you choose a starting task.

Clicking “No” displays all tasks on the map so you can pick one, such as the one closest to your location. 

Further Tutorials

Add trails

The “Add Trails” function allows you to add new trails using their access codes. This also lets you find private trails or share them with others. Here’s a step-by-step guide to adding trails:

Step 1 – Open the Trails Section

Click on the “Add Trails” field on the start page.

A window titled “Private Trail or Session” will open.

Alternatively, you can access this view by clicking the plus symbol in the top right corner of “Browse Trails.” 

Step 2 – Enter the Code

Each trail has its own code so that it can be shared specifically with other MCM users.

Enter the relevant code in the window that appears and click on “Add”. 

Step 3 – View Information

You will receive a notification confirming the trail has been successfully added. After clicking “Ok,” the trail’s details will appear.

This includes grade level, distance from your current location, duration, and length (the route you need to walk).

To ensure this trail is available later in your saved trails, click “Download Trail.”  

Further Tutorials